Stampin’ Up! Trusty Tools for a Graduation Card

Happy Mother’s Day all you readers… You may remember last weekend I attended a convention, a one of my fellow ‘conventioners’ asked for a special graduation card as the graduate is going into auto mechanics. I pulled out Trusty Tools to see what I could do. I also used a couple of other stamp sets.

Stampin' Up! Trusty Tools graduation card

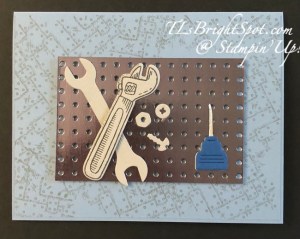
This doesn’t look much like a graduation card, does it? At least not on the front. Here’s what I did though… I pulled out Boho Blue for the card base (school colors are blue and something else, the woman couldn’t remember) … and stamped the front with what looks like parts welded together, stamped in Smoky Slate. It comes from the new & fabulous Adventurous Sky stamp set. Next I die cut this center panel that looks like a peg board from new Textured Metallic Specialty 12×12 Paper. The color is Tungsten. From the Trusty Tools stamp set and coordinating dies, I pulled out items that I thought an auto mechanic would typically use – wrenches bolts, nuts and an oil can. I stamped in Memento ink the adjustable wrench, the other items I simply die cut. The oil can is from Silver Foil Sheets and cut twice, the other being Blueberry Bushel. I trimmed off the blue oil can top and adhered the blue bottom to the silver oil can – for contrast. I put this on dimensionals and added it to the peg board. The one wrench – the non adjustable one – is adhered directly with liquid glue, the adjustable one is on dimensionals. The screw & bolts are attached with glue as well. I added the peg board to the card front with mini dimensionals.

Stampin' Up! Trusty Tools, card inside

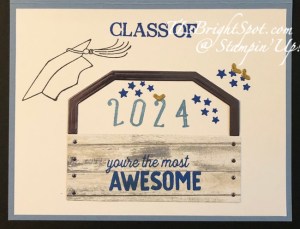
I began the inside by cutting the toolbox bottom from Country Woods DSP. I adhered the base to the Basic White inside panel then attached the leftover hole centers from the peg board to the holes created by the toolbox bottom die cut. (Clever me!!) Using another piece of the Textured Metallic Specialty Paper in Tungsten, I die cut the handle and added it as well. Then it was – now what??? I pulled out Cap & Gown stamp set and stamped the cap in Memento ink & ‘Class of’ in Blueberry Bushel. I stamped the sentiment on the toolbox using the Trusty Toolbox stamp – again in Blueberry Bushel ink. The numbers (Boho Blue ink) & stars (Blueberry Bushel ink) come from Alphabest stamp set, a retired one. The gold hearts are from it’s coordinating dies.

Stampin' Up! Trusty Tools graduation, card back

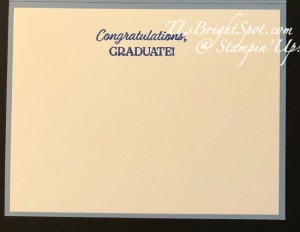
Since there was noway to send a written greeting on the inside of the card, I added another piece of Basic White to the back of the card. On it is the sentiment stamped in Blueberry Bushel from the Cap & Gown stamp set.

Stampin' Up! Trusty Tools gradiation card & envelope

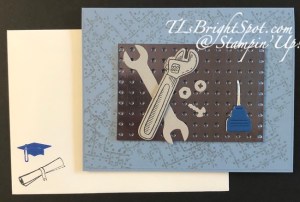
For the envelope, I did a simple stamp of the cap in Blueberry Bushel and the diploma in Memento black ink – both from the Cap & Gown stamp set.

The 24-25 Annual Catalog is now live… here’s a link to take you directly to the items available in this catalog. The Trusty Tools bundle is in the encore section. The Adventurous Sky bundle is in the Suites section. The cap & Gown stamp set can be found in the ONLINE EXCLUSIVES. Happy shopping!

Stampin’ Up! has a fabulous joining opportunity from May 1-31.

Stampin' Up! Joining Promotion

To join is $99 and what comes with joining, besides your 15-20% discount on every order… FOUR FREE IN COLOR PRODUCTS valued to $82 plus your choice of $125 worth of products. Those FREE items – the IN COLOR products – Classic stampin’ pad bundle – 5 of them, package of 8 1/2 x 11 cardstock – 5 of those, 6×6 Designer Series Paper – 5 colors in the pack, and the coordinating Stampin’ Write markers. You will also receive free shipping on these products + free business supplies. What’s not to like about this joining special – remember it begins May 1! Join with me by following this link...

To view all the available ONLINE EXCLUSIVES, click here.

Clearance items may be found here

While you’re looking around in my store, remember there are some stunning kits available, for all ages and all seasons – even Christmas! And while you’re shopping, I offer fringe benefits to my customers: free tutorial of the month and a FREE Stampin’ Up! item valued to $10 – all for a $50 order, before shipping and taxes. Use my current host code to receive those benefits – especially when your order does not exceed $150.

HOST CODE 4JF6ZWC9

Thanks for stopping by. May you have a beautiful day. Make someone happy when sending them a handmade card filled with love.

Stampin’ Up! Let’s Set Sail Scene for the Happy Inkin’ Thursday Blog Hop

Happy Thursday! It’s almost the weekend… do you have something fun planned? Welcome to the Happy Inkin’ Thursday Blog Hop! If you have come from Tara’s fun creation, welcome to the hop here at my blog. There will be lots of variety today, I betcha!

It’s the Happy Inkin’ Thursday Blog Hop… with a challenge, of course…

And here’s what I did…

Let’s Set Sail Scene.1

I began with a piece of Hues of Happiness 12 x 12 DSP, a blending Brush or two and several ink colors to create a brilliant sun: Whisper White, Mango Melody, Pale Papaya, Calypso Coral, Pumpkin Pie and Cajun Craze. I also some sticky notes so as I created the gradient, I was keeping kind of a line as I varied the colors. I really like how these just flow together. Once I got it sort of the way I wanted it, I removed the sticky notes and with Pale Papaya and Calypso Coral, went over the entire area to remove distinguishing lines. I then die cut two circles using the Stylish Shapes Dies. Next I took the long stamp in Let’s Set Sail stamp set and Balmy Blue ink and began creating a water layer on a panel of Basic White. These were the beginning steps for my scene. I adhered the largest circle with liquid glue to this Basic White panel, then put dimensionals on the smaller circle and layered it on top, matching the lines created when using the sticky notes and Blending Brush. I wanted some sparkle, so pulled out the 2022-2024 In Color 6×6 Glimmer Paper in Tahitian Tide and with the Sailboat Builder Punch, punched a sailboat. I placed the various pieces of the sailboat then added mini dimensionals in all the right places and dabs of liquid glue in others and put it in place. I stamped the water shadow just beneath the boat in Pacific Point ink. The birds were stamped with Memento ink. The sentiment also comes from Let’s Set sail stamp set and it was stamped in Balmy Blue and fussy cut. I put dimensionals on the back and adhered it to the card. I then colored two Rhinestone Basic Jewels with Dark Balmy Blue Stampin’ Blends and put them in place – card front was ready to put together.

I adhered the completed front to a piece of Balmy Blue just slightly larger, put dimensionals on the back and added it to a Thick Basic White card base. Front done!

Let’s Set Sail Scene, inside

For the inside I cut two very thin strips: one from the paper I had colored to create the suns and another from the 2022-2024 In Color 6×6 Glimmer paper in Tahitian Tide. These were adhered with liquid glue to the Basic White panel. I then stamped the sentiment – yep! – Let’s Set Sail stamp set, in Balmy Blue ink. This panel was adhered to another piece of Balmy Blue card stock then added to the inside of the card. This card is perfect for so many occasions: graduation, Father’s Day, promotion, retirement, etc.

Let’s Set Sail Scene.3

For the envelope, I took another part of the Hues of Happiness 12 x 12 DSP and added it to the flap, trimmed to fit. For the front, I stamped the water in stamped-off Balmy Blue ink then stamped the boat/ mast in Pacific Point ink and the two sails in Pale Papaya ink. All done! What do you think? Does the envelope look a bit like a scene in itself? I think so :O)

Products to make this card are listed below. If you do not have a demonstrator and need an Annual Catalog please reach out to me (the 2022-2023 AC) – happy to send one to you. When ordering, please also use current host code: AZQDZ4U4. I offer my customers a free item from Stampin’ Up! item valued to $10 with your order of $50 and above. Click here to go my store. When the order is over $150, you still receive that free gift from me, but SU! has Stampin’ Rewards that may be used for additional products, so don’t use the host code at that time. If you have questions just let me know. If you would like to be able to order products early from catalogs AND enjoy that 20% discount, join my team now… you may do that here. WooHoo! We have lots of fun and are a creative bunch that encourages & supports one another. Would love to have you. :O)

Now, it’s time to move on with the hop! If you click the ‘next’ button, it will take you to Amy Koenders. If you click on a name, it will take you to that persons creation. Happy hopping!

Amy Koenders

Mary Deatherage

Sue Prather

Karen Finkle

Akiko Sudano

Karen Ksenzakovic

Tara Carpenter

Terry Lynn Bright

Let’s talk starter kit… New In Colors, New 2022-2023 Annual Catalog release

Starter Kit Price: $99 USD | $135 CAD
Redemption Value: $125 USD | $165 CAD
Additional In Color Products: $66.50 USD | $91.25 CAD

 In Color Grid PaperIn Color Ink Pad Collection, In Color Cardstock Collection, and In Color 6″ x 6″ (15.2 x 15.2 cm) Designer Series Paper Assortments. 

You’ll also get a free Paper Pumpkin kit! 

PROMOTION DATES: 3–31 MAY 2022

Join our incredible group of crafters and creators.

If you would like to be able to order products early from catalogs AND enjoy that 20% discount, join my team now… you may do that here.

Just a few of the perks of being a Stampin’ Up! Demonstrator AND part of our Critters ‘n Creatin’ Krew Team:

  • At least a 20% discount on everything that you order as a Demonstrator!
  • Early peeks at new release items and preorders for new items about a month before they are available to customers!
  • The ability to attend Demonstrator exclusive Stampin’ Up! events!
  • No pressure to sell to anyone, hold classes or workshops or run a business.  You can simply order for yourself and get the discount!  And as long as you have at least $300 in sales per quarter, you’ll continue as an active Demonstrator and continue to get the discount.  If you aren’t able to maintain the $300 per quarter minimums, you simply go back to being a customer, no commitment required and no penalty if decide that being a Demonstrator isn’t right for you.
  • Stampin’ Up! does have an extensive library of class and project ideas for those wishing to jump into hosting classes as well as training to help start your business, should you choose to do that.

If you join with me, you’ll also get:

  • Monthly team meetings via video conference where we talk about the latest happenings at Stampin’ Up! and share project ideas.  Team members are located all over the United States, but we still get together in person online and have lots of fun.
  • Quarterly in-person meetings if you live in the NJ or surrounding area, where we get together to do a little stamping, creating, getting to know one another and most of all SHARE inspiration. If you live outside the NJ area you can join us through that wonderful ZOOM video conference.
  • Free access to our online class tutorials. These are exceptional!
  • A private Facebook page where we can chat, ask questions and share ideas.
  • Team giveaways and prizes for reaching sales and team goals or attending specific meetings. 😉
  • The best part is the laughing and kidding and sharing of information/ creativity/ talent ~ following the SU! adage: Inspire. Create. Share. ❤️ 😁

Join our incredible group of crafters and creators.

If you would like to be able to order products early from catalogs AND enjoy that 20% discount, join my team now… you may do that here

Remember to connect with me if you need a catalog!