This comes at a perfect time for me to order some of my basics… card stock, adhesives, tools. Don’t miss out on this opportunity! Shop here now. See below for more information when shopping with me…
All order types qualify for this promotion.
Free shipping is for 24 hours only. Orders must be opened and closed on September 18, 2024.
Free shipping automatically applies to your cart after the qualifying amount has been met, which is $75 USD | $100 CAD (before tax).
Coupon codes and product credits are non-commissionable and will lower your order’s retail amount. Orders must meet the qualifying amount to be eligible for free shipping.
The additional cost for expedited shipping is not covered by this promotion.
Prepaid 3-, 6-, or 12-month Paper Pumpkin subscriptions can contribute to the qualifying amount for free shipping (Month-to-month subscriptions do not qualify). Subscriptions billed and shipped this month will be charged for the normal amount ($25.00 USD | $34.75 CAD shipping included) + tax.
I appreciate your business and welcome any questions regarding sales or creating or joining my team. Make sure when shopping with me, that you see my name at the top as your demonstrator. That way I can send you a Stampin’ Up! giftie and you can earn rewards – with a $50 order or more. You also receive the monthly tutorial for that particular month – September is Autumn Expressions.
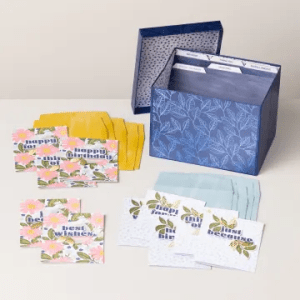
There are new kits available beginning Sep 4 – check by clicking here.
Christmas Ornaments Kit – NEW!
Card Keeper Kit – NEW!
Thanks for stopping by – remember FREE SHIPPING TODAY ONLY for orders of $75 & up!
What is your passion? Do you like doodling, creating, doing or making things for others? I enjoy people, most people that is, and I enjoy creating mostly for others. Creating calms me when life sometimes gets out of control. It lowers my stress level when life gets out of balance. Thursday was a card class day and we used the the Decorative Trees bundle. This is in the Sep-Dec 2024 Mini Catalog and I highly recommend it. This catalog goes live Sep 3 – just days away. Let’s look at what we made…
Talk about Christmas – this is it! Oh Christmas tree, Oh Christmas Tree, how lovely are thy branches. Hee Hee. This does NOT show the glittery paper! Darn! However… this is a two step tree die cut, using two dies. The first tree is the background and is die cut from Festive 12 x 12 Glimmer Paper in Granny Apple Green. The next layer is plain Granny Apple Green cardstock with Adhesive Sheet applied to it. The Adhesive Sheet allows you to peel back and stick – similar to how we use dimensionals. :O) When the die cut is delicate, it makes it so easy to use the Adhesive Sheets. Now the tree is together, let’s work on the rest of the card.
the card base is Garden Green 4 1/4 x 11 and scored at 5 1/2
layer Basic White 4 1/8 x 5 3/8 and adhere to card front.
next layer is Granny Apple Green 4 x 5 1/4 and embossed in the Birch Wood 3D embossing folder, then adere directly to the Basic White
next layer is Basic White 3 1/8 x 3 1//8
final layer is Take A Bow 6x6b DSP cut 3 x 3 and adhered to Basic White: both adhered to card front with equal top & side edges
add the tree with dimensionals
add a double bow from Natural Tones Linen Thread in Garden Green – a glue dot works well
The card front sentiment comes from the Decorative Trees stamp set. I wanted this sentiment to have a sheen and have heat embossed in clear embossing powder. Here’s how…
ink the sentiment with VersaMark ink, then ink right away with Garden Green ink and stamp on the Basic White strip 1 x 3 1/8
sprinkle with Clear Embossing Powder and heat set with the heat tool.
Attach the Basic White sentiment strip to the card front with dimensionals and add Adhesive-Backed Shiny Sequins in Granny Apple Green.
For the inside, I wanted the same sheen to the sentiment from Decorative Trees stamp set:
ink sentiment with VersaMark ink, then ink stamp with Garden Green ink – stamp the 4 x 5 1/4 Basic White panel
sprinkle the ink with Clear Embossing Powder and heat set with the Heat Tool
For the envelope…I used the same Take A Bow 6×6 DSP pattern to adhere to the flap and trimmed to fit. On the front I stamped the tree image from Decorative Trees stamp set in Garden Green ink – and done!
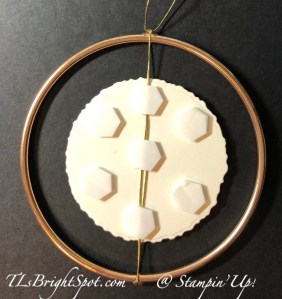
For our second project, we created an ornament using the Decorative Trees Dies only. Below are the front, attached loop for hanging and dimensionals to hold in place and last photo is the back side, DSP only.
I used the Decorative Trees outline die to die cut the tree from another DSP in the Sep-Dec Mini Catalog: Season of Elegance SDSP in Pretty Peacock, cut 2. I die cut the snowflake/ tree detail die from Nests of Winter DSP to which I added Adhesive Sheet for easy adhering. I also added Adhesive-Backed Sparkle Gems to two places on the snowflake diecut. Isn’t this paper gorgeous? It comes in Pretty Peacock, Cherry Cobbler and Basic Beige.
If you do not have a demonstrator and need a catalog – please connect with me soon so you can enjoy all the fun products in this Sep-Dec Mini Catalog. And if you decide to shop with me – you may do that here.
Use my HOST CODE when you order for those fringe benefits… Free item of the month with a $50 order: Drusy Adhesive-Backed Embellishments and the tutorial of the month! These embellishments will be ordered at the end of the month and sent out to customers with that $50 & up order!
host code ZBAU6PKX
Remember that Designer Series Paper Saloe – still 15% off through Aug 31…
Thanks for stopping by. I hope you have found these projects inspiring and helpful. If you have questions, let me know! I’m happy to answer them.
May you have a beautiful day. Make someone happy by sending them a handmade card made with love.
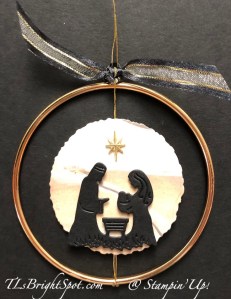
Good Sunday morning! My 4″ metal rings arrived yesterday afternoon and I couldn’t wait to play. Remember I posted the ornaments on 3″ rings the other day – that link is here.
I used the O Holy Night 12 x 12 DSP to cut a circle with the Deckled Circles Dies. Which one? Beginning with the smallest, count six circles – that’s the one :O) I cut a backing as well, but from Night of Navy card stock. I cut various star shapes using many of the dies in Stars of Night Dies from various papers: Distressed Gold, Shimmer Paper, Gold Foil, and Adhesive-Backed Gold Glimmer Paper. These are wonderful dies!!!
Instructions:
Cut a length of ribbon about 20″ in length – possibly Linen Thread. Fold in half and slip the ring into the fold.
Secure the Linen Thread at the bottom and top with a glue dot. (I used my grid paper to make certain it was centered.) Tie a double knot at top: left over right, then right over left.
Slip the backing circle under both threads, centering the circle. Put a dimensional over the linen thread near the top of the circle.
TWIST THE THREAD and secure in place with a dimensional near the bottom of the circle. Add more dimensionals as needed.
Add top Designer Series Paper, matching notches in the deckles. I used O Holy Night 12 x 12 DSP.
Add layers of die cut stars as desired. On the above ornament, the largest star is on dimensionals as is the smaller Shimmer Paper die cut and the very top star as well. I decorated the center of the star with an Iridescent Pearl.
As a finishing touch, I tied a length of the Night of Navy & Gold Glitter Ribbon in a knot at the top of the metal ring.
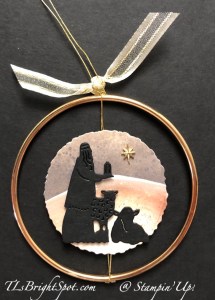
In the Stars At Night stamp set is a stamp for the largest star and I stamped it on Basic White card stock in Night of Navy ink, three times, re-inking between each stamp. The key here is to have each paper cut 3 x 4 as the die for this star is attached on either side by another die. You can see in this photo I couldn’t wait for the 4″ metal ring and made this ornament on the 3″ ring. I like it so much better framed on the 4″ ring! True, the ornament is different, but… this larger star needs the larger ring, in my opinion. Here is a side view to better show the three stars adhered together.
And in the case of this ornament, I adhered the deckled circles to the ring, both back and front. This can fold flat for storage if needed.
If you would like to order this or any other items, this is a link to my online store. You will find ONLINE EXCLUSIVES, Clearance Rack, Sep-Dec Mini Catalog, the Annual Catalog, kits, Paper Pumpkin – you name it. Shop at your convenience :O)
When ordering from me please use my HOST CODE2J2X3YRM so that I receive proper notification and YOU GET THE Benefits of a FREE SU! item valued up to $10 :O) AND the Monthly Card Tutorial. If your order is over $150, please don’t use the host code as SU! has benefits. I’ll still be notified and you can receive that FREE ITEM!
Note: Make sure that you can see my name on the final checkout page listed as your Demonstrator when you order so that you know that you’re ordering with me and you’ll get my rewards! PLUS… the monthly Online Tutorial when your oder is over $50. The October Tutorial features the beautiful Merriest Trees Bundle which can found in the Jul-Dec 2023 Mini Catalog on page 12!
Stampin’ Up! is offering an amazing deal as they are celebrating 35 years in business.
Starting Oct 3 and going through to Oct 31 is a Starter Kit Special you will not want to miss. Celebrating 35 years of Stampin’ Up!, new demonstrators will be able to choose 35% OFF the cost of their Starter Kit or get 35% MORE product with their Starter Kit.
With option 1 (35% off the normal cost of the starter kit), the new demo would receive $125 worth of products and pay $64.35 + tax. and of course, shipping is FREE.
With option 2 (35% more SU! product) the new demo would pay the usual $99 plus tax of course, and get $168.75 worth of SU! product that you get to choose! And as before – – shipping is FREE!
MORE – MORE – MORE… With either option, those who sign up for the starter kit between Oct 3 and Oct 31 will automatically get signed up for the ONSTAGE@HOME Registration, again FREE! This is a virtual event being held November 11. (Normally the cost of registration would be $77) If you join as demonstrator during the time frame mentioned, you will receive in your email, all the information necessary to attend this virtual event.
Have I intrigued you, inspired you, made you think maybe this is the time to join as a demonstrator? If so, – would love to have you. Remember, hobby demonstrator (for the 20% discount) or a business demo (at least 20% off all demonstrator orders – or more) or somewhere in between. It just doesn’t matter. What does matter is if you like to stamp, color, ink up, create – that’s where it all blends into having fun and doing it with others.
Those who sign up for a Starter Kit during this offer will also be automatically registered for FREE* to our virtual OnStage event on 11 November – that’s a $77 value! And – you don’t even have to travel – just do it from home. In your jammies, if you like!
Those who sign up for this offer have the opportunity to watch the event independently, gathered together with other demonstrators, or with their Team Leader.
Demonstrators who join during this promotion will be automatically added to the OnStage attendees; you won’t even need to register separately.
Demonstrators who join during this promotion will also receive an email with all the information about this event.
Whether you’d like to start a little side business or simply take advantage of the awesome 20% discount, I would very much love for you to join my Krew team! We have a great time together – even though we live all over the country!
Thanks for stopping by. May you have a beautiful day!
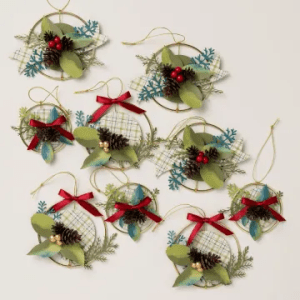
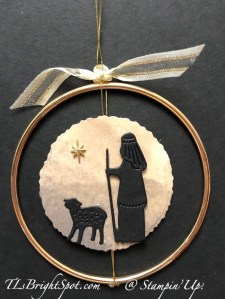
Good morning Friday! I have a fun project for you today, ornaments! They are made with the Night Divine Dies, Deckled Circle Dies and Holy Night Designer Series Paper. We made these in my class yesterday :O)
Aren’t these beautiful? There was a video of how to make these on the Facebook Stampin’ Up! page and I loved the idea. The trickiest part is lining up the front & back of the papers – because of the edges of the Deckled Circles Dies. The first step is to either order the gold hoop online or look for them in a local craft store. These are 3″ hoops, and I used Simply Elegant Trim in Gold to attach to the DSP. You could also use Linen Thread.
Die cut the images from Basic Black card stock using the Night Divine Dies. besides the main image, I die cut an extra camel, and two sheep
Cut apart the shepherd and the wise man from the main image, leaving only Mary, Joseph and creche. See photo 1.
Using Deckled Circles Dies, die cut several circles from the Holy Night Designer Series Paper – or DSP of choice.
Using the same size die, die cut an equal amount of circles from Very Vanilla card stock, or coordinating card stock of your choice.
Align the DSP circle and the Very Vanilla circle so the deckled edges line up just right. Mark with pencil on the Very Vanilla piece. This will help align the two pieces later.
Add the die cut images as desired to the various DSP circles either with liquid glue or dimensionals. On these ornaments, Mary & Joseph are on dimensionals as are the Shepherd and the Wise Man.
Fold the Linen Thread in half and lay on surface. Hold thread in place with a glue dot at bottom and a glue dot at top of 3″ ring. Tie a double knot.
Slip the Very Vanilla panel under the thread making certain it is centered in the 3″ hoop. My pencil mark is under the thread, unseen.
Attach dimensional near top of circle over the Linen Thread. Twist thread, separating a bit and add dimensional near bottom of circle. This ‘twist of the thread” will keep the ornament straight in the hoop! Add additional dimensionals as necessary. See photo.
Notice the twist of the thread? Did I mention how important that is? Good.
Remove backing on dimensionals and add the DSP layer.
Add Adhesive-Backed Star Trinkets. I used the larger star for Mary & Joseph and the smaller star for the other ornaments.
Cut a length of the the Very Vanilla Edge Ribbon and tie around Linen Thread at top of hoop in a double knot. This adds a finishing touch. You will notice that I chose to color some of the ribbon on the various ornaments using my Basic Black Stampin’ Blends. The coloring was done only on the very vanilla edges of the ribbon. I chose not to color every one though.
Very fun project! These Dies and Designer Series Papers may be found in the Sep-Dec 2023 Mini catalog. You can see other ornaments on page 17 of this catalog – and I will be posting similar ones later.
When ordering from me please use my HOST CODE2J2X3YRM so that I receive proper notification and YOU GET THE Benefits of a FREE SU! item valued up to $10 :O) AND the Monthly Card Tutorial. If your order is over $150, please don’t use the host code as SU! has benefits. I’ll still be notified and you can receive that FREE ITEM!
Note: Make sure that you can see my name on the final checkout page listed as your Demonstrator when you order so that you know that you’re ordering with me and you’ll get my rewards! PLUS… the monthly Online Tutorial. The October Tutorial features the beautiful Merriest Trees Bundle which can found in the Jul-Dec 2023 Mini Catalog on page 12!
Stampin’ Up! is offering an amazing deal as they are celebrating 35 years in business.
Starting Oct 3 and going through to Oct 31 is a Starter Kit Special you will not want to miss. Celebrating 35 years of Stampin’ Up!, new demonstrators will be able to choose 35% OFF the cost of their Starter Kit or get 35% MORE product with their Starter Kit.
With option 1 (35% off the normal cost of the starter kit), the new demo would receive $125 worth of products and pay $64.35 + tax. and of course, shipping is FREE.
With option 2 (35% more SU! product) the new demo would pay the usual $99 plus tax of course, and get $168.75 worth of SU! product that you get to choose! And as before – – shipping is FREE!
MORE – MORE – MORE… With either option, those who sign up for the starter kit between Oct 3 and Oct 31 will automatically get signed up for the ONSTAGE@HOME Registration, again FREE! This is a virtual event being held November 11. (Normally the cost of registration would be $77) If you join as demonstrator during the time frame mentioned, you will receive in your email, all the information necessary to attend this virtual event.
Have I intrigued you, inspired you, made you think maybe this is the time to join as a demonstrator? If so, – would love to have you. Remember, hobby demonstrator (for the 20% discount) or a business demo (at least 20% off all demonstrator orders – or more) or somewhere in between. It just doesn’t matter. What does matter is if you like to stamp, color, ink up, create – that’s where it all blends into having fun and doing it with others.
Those who sign up for a Starter Kit during this offer will also be automatically registered for FREE* to our virtual OnStage event on 11 November – that’s a $77 value! And – you don’t even have to travel – just do it from home. In your jammies, if you like!
Those who sign up for this offer have the opportunity to watch the event independently, gathered together with other demonstrators, or with their Team Leader.
Demonstrators who join during this promotion will be automatically added to the OnStage attendees; you won’t even need to register separately.
Demonstrators who join during this promotion will also receive an email with all the information about this event.
Whether you’d like to start a little side business or simply take advantage of the awesome 20% discount, I would very much love for you to join my Krew team! We have a great time together – even though we live all over the country!
Thanks for stopping by. May you have a beautiful day!