
Welcome! It is the 2nd Tuesday of the month and time for Amy’s Inkin’ Krew Blog Hop. I hope you enjoy the creations you see today. The theme is ‘celebrate summer’ and we can interpret that any way that inspires. I think you may see a lot of different ideas here today. I have chosen to work with the Country Woods Designer Series Paper and the Country Birdhouse bundle to prepare today’s card.
This card uses two particular bundles: Country Birdhouse and it’s coordinating dies and Nested Friends and it’s coordinating dies. Nested Friends is now an ONLINE EXCLUSIVE set, while Country Birdhouse is in the new 2024-2025 Annual Catalog. I began by making the birdhouse portion first then the rest of the card followed.
Directions:
- Fold a piece of the Country Woods DSP (8 1/2 x 11 to 4 1/4 x 11)
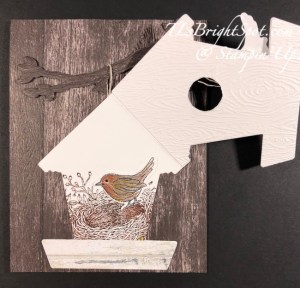
- Lay the birdhouse die (from Country Birdhouse Dies) along the fold line with one side of the roofline extending beyond the cutting line until it is OVER the fold – meaning it will NOT cut along the fold. (You can place either side of the roof beyond the fold). Die cut. You now have a birdhouse that opens & closes along one side of the roof. :O) YAY!
- Die cut the hole opening using the appropriate die
- Die cut the additional roof decorations from Country Woods DSP – noting the direction of the grain (this happens to be the Misty Moonlight color in the pack)
- Die cut the bottom panel on the birdhouse – adhere all pieces. There is one die cut from Basic White and I layered it over the other two, where they are adhered together.
- See that little small circle piece below the opening – that is supposed to indicate a landing spot for the birds!
- Stamp the bird on the front in Memento ink and color with Watercolor Pencils: Real Red, Early Espresso, Basic Gray
- These are house finches – the male has the red head and a bit of red down the front breast. Intermixed is some gray & brown.
- I used short strokes, not covering the entire bird at once, to make it look more like feathers.
- I colored the eye with a Basic Black Marker using the fine tip end
- I clipped the beak down the center of it, cut a short length of Linen Thread, took the fibers apart and ‘encouraged’ them into the cut of the beak. I turned this item over and added a dot of liquid glue to secure the thread in place. I put dimensional on the bird and added it to the birdhouse front. The male finch is helping it’s partner build a nest – it’s what they do!
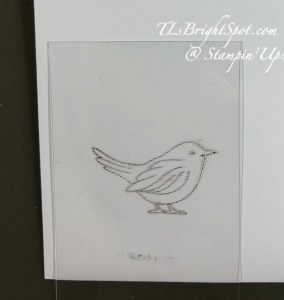
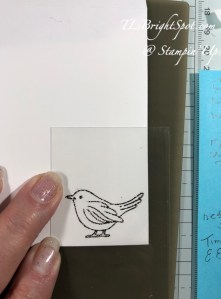
- To create the opposite facing bird is called ‘reverse stamping’.
- Using Memento ink, ink the stamp and stamp a Window Sheet, then turn the window sheet over and place it on a Basic White scrap. Rub over the window sheet without it moving, then lift window sheet. A bird stamped in reverse has been created!
- Color it with Watercolor Pencils: mostly Early Espresso, Basic Gray, just a bit of real Red and some Crushed Curry. Keep going over this until satisfied with the result. This is a female finch!
First of all, more photos should have been taken! What you are seeing is the female finch bird already die cut & adhered in place. :O(
I used the Nested Friends stamp set for the nest, inked with Early espresso ink then used a sponge dauber to add a bit of Copper Clay in places, then stamped it directly to the inside of the birdhouse. I adhered the female finch inplace with liquid glue. I diec ut another piece of Country Woods DSP for the bottom strip on the birdhouse inside.
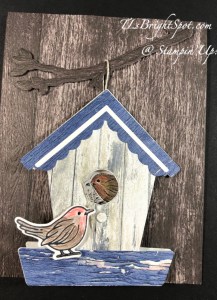
The card base is Early Espresso, 4 1/4 x 11 scored at 5 1/2. Adhered to that is a Country Woods panel 4 1/4 x 5 1/2 that I ran through the Timber 3D embossing folder. I stamped this wonderful branch in Early espresso ink using the Nested Friends stamp set, then die cut it with Nested Friends Dies. I adhered the tree branch in place with mini stampin’ dimensionals. I took a length of Linen Thread and put it over the branch and adhered it in place with Seal+. I adhered the birdhouse over that with liquid glue – to make it appear as though the birdhouse was hanging from the tree branch.
With the card front complete, I worked on the inside of the card.
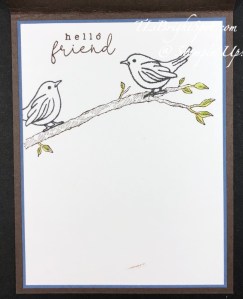
I began by stamping the branch from Nested Friends in Early Espresso ink on the Basic White panel. Using the Country Birdhouse stamps, I stamped the bird on the left in Memento ink, then stamped the bird on the right using the Reverse Stamping method. I colored the leaves with Stampin’ Blends: Granny Apple Green. I stamped the sentiment from Country Birdhouse in Early espresso ink. With the stamping complete, I adhered this to a slightly larger Misty Moonlight, then to the inside of the card.
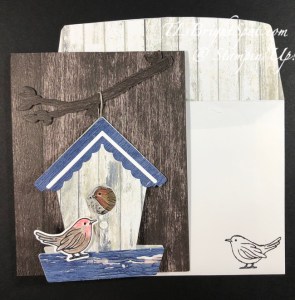
For the envelope, I used more of the Country Woods DSP to add to the flap, trim to fit. I stamped the bird on the right side using the reverse stamping technique as mentioned above.
Now … time to see what the others on the team have created. click the previous button or the next button… or click on a name. Remember to also read more info below on how to purchase these products from me.


- Tara Carpenter
- Karen Ksenzakovic
- Mary Deatherage
- Ann Louise Fodgaard
- Karen Finkle
- Terry Lynn Bright
- Carol Buckalew
- Christie King
- Amy Koenders
here’s a link to take you directly to the items available in this catalog –
and to shop with me.
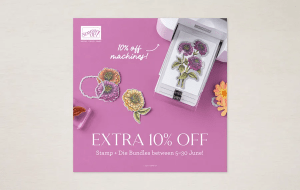
STAMPIN’ UP! STAMP & DIE BUNDLE 10% OFF SALE!!
Sales Period: 5–30 June 2024
Ordering Deadlines
Phone: 28 June 2024 at 6:59 p.m. (MT)
Online: 30 June 2024 at 11:59 p.m. (MT)
Get an additional 10% discount on stamp and die bundles only (that’s a total of 20% discount on stamp and die bundles!). This excludes suite collections, stamp and punch bundles, bundles not yet released to customers, and any other bundles*.
Save 10% on Stampin’ Cut & Emboss Machine and Mini Stampin’ Cut & Emboss Machine (white and Boho Blue).
The 10% discount applies automatically to stamp and die bundles in all orders… including Starter Kit orders.
See and shop all qualifying bundles in the online store.
Please note Close to My Heart products are not included in this promotion.
Stampin’ Up! Demonstrators get the SAME discounts and sales that CUSTOMERS do – on TOP OF their demonstrator discount
Keeping that information in the forefront of your mind,
NOW is a perfect time to JOIN THE TEAM!
Join with me by following this link...
To view all the available ONLINE EXCLUSIVES, click here.
Clearance items may be found here
While you’re looking around in my store, remember there are some stunning kits available, for all ages and all seasons – even Christmas! And while you’re shopping, I offer fringe benefits to my customers: free tutorial of the month and a FREE Stampin’ Up! item valued to $10 – all for a $50 order, before shipping and taxes. Use my current host code to receive those benefits – especially when your order does not exceed $150. Make certain my name is listed as your demonstrator when checking out! :O)
HOST CODE BAQG9RSE
Thanks for stopping by. May you have a beautiful day. Make someone happy when sending them a handmade card filled with love.

This is such an awesome card Terry Lynn. Love how you attached the birdhouse to a branch. LOVE it!!
LikeLiked by 1 person
Thanks Karen. Sometimes puzzle pieces realloy do fit together 😁
LikeLike
Pingback: Stampin’ Up! Beach Day Book Fold Sending Sunshine Card for Amy’s Inkin’ Krew Team Blog Hop – Inky Bee Stampers
Awesome card Terry Lynn! The little birdhouse is so sweet, love the woodgrain paper too! 🙂
LikeLiked by 1 person
That Country Woods DSP is fabulous! This card is a little dark – but I kept thinking the background as a tree. oh well! Thanks for the positivity though!
LikeLike
Sweet birdhouse and birds! Nice with the branch it’s hanging on too. 🥰
LikeLiked by 1 person
Thank you, thank you!
LikeLike
Such a pretty card, Terry Lynn, and fantastic coloring on the birds! I love watching the house finches from our backyard!
LikeLiked by 1 person
Thanks Carol. I was actually watching a male finch wooing a female finch the other day. Never seen that in person! Fascinating…
LikeLike
Just WOW!!!
Love, love this one. Your coloring of the finches is great. Ingenious way to open the house. Definitely will be CASeing this one. Have both sets and the wonderful DSP
LikeLiked by 1 person
Well thank you so much Julie. With all your bird watching you can probably color them without a photo in front of you! Have fun with it!
LikeLike
So, Sunday after Rosie’s demo I thought, “Well, maybe.” Today with your finches I thought, “I’ve got to have this bundle!” your inside with the next is phenomenal.
LikeLiked by 1 person
Thank you Karen – you made my day! I pulled up a photo of finches (cuz we have a lot of them on our feeders) and I used those as my guide for coloring. :O)
LikeLike
SO fun and SO clever – I love it! 🙂
LikeLiked by 1 person
Thank you Mary – and I thought I wouldn’t like this bundle… ha! love it!
LikeLike