Stampin’ Up! Soft Seedlings for the Happy Inkin’ Thursday Blog Hop

Hello & welcome to the Inkin’ Krew Thursday blog Hop! You may have popped in from visiting Tara, or you may have simply jumped in right here. However you arrived, welcome! The theme for today’s hop is Thankful and gosh, there are so many ways to show this. It’s beginning to feel a bit like fall here on the east coast and I have chosen to use the Soft Seedlings stamp set and some Pool Party ink with Water painters to create my card today. To me it reminds me of a bird bath with leaves floating in the water :O)

And here’s my card…

Stampin' Up! Soft Seedlings Grateful. hop 10/6

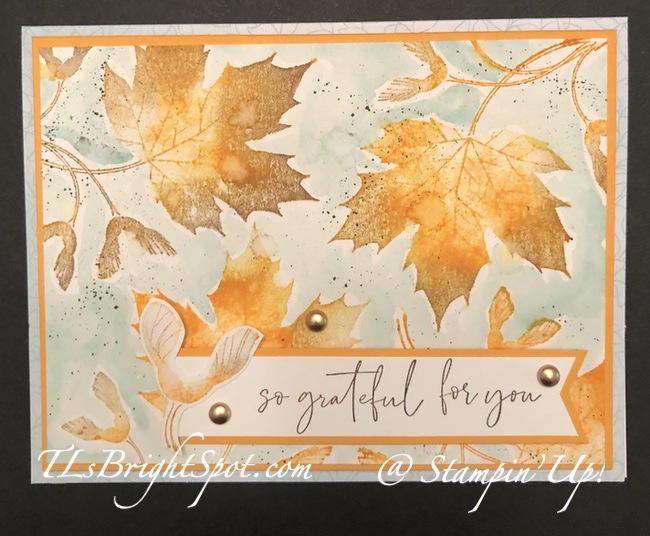
My background is Shimmery card stock, stamped with the Soft Seedlings large leaf stamp, then sort of water colored w/ Pool Party and a Water Painter. Let me tell you first about the stamping… ink the stamp with Mango Melody then with Early Espresso ink and a Blending Brush or a dauber, add color to various edges of the leaf, stem or the “whirly-gigs”, then stamp on the Shimmery card stock. Clean stamp and repeat the process, making it different each time, either more of the Mango Melody or more of the Early Espresso ink. Do this stamping randomly on the Shimmery paper until it is mostly covered. With Pool Party ink and a Water Painter, color in the empty white spaces. Notice it isn’t the same all over, it has depths of shade. Once you have covered with Pool Party to your liking and that ink is dry, spritz gently with water creating water spots – like rain drops. Once that is dry, use the Early Espresso marker to ‘flick’ spots in various places. Allow to dry, then add to a Mango Melody panel. Put dimensionals on the back and add to a Pool Party card base. This ‘happens to be’ a card base from Sale-a-bration – free with a qualified purchase – now since retired. BUT… you could EASILY use a Pool Party card base to make this work just as well!

For the sentiment, I used stamps from the Soft Seedlings stamp set, inked in Early Espresso and stamped on a Basic White strip. The end is ‘bannered’ with the Banners Pick A Punch. I used the same punch to create a bannered end to a strip of Mango Melody, adhered them together and attached with dimensionals to the card front. I stamped another “whirly-gig” using the same process: Mango Melody ink, then adding Early Espresso with a Blending Brush. I fussy cut this piece and added it to the sentiment strip with liquid adhesive. The final touch was the Brushed Metallic Adhesive-Backed Dots. Love these!

Stampin' Up! Soft Seedlings 'whirly gigs'

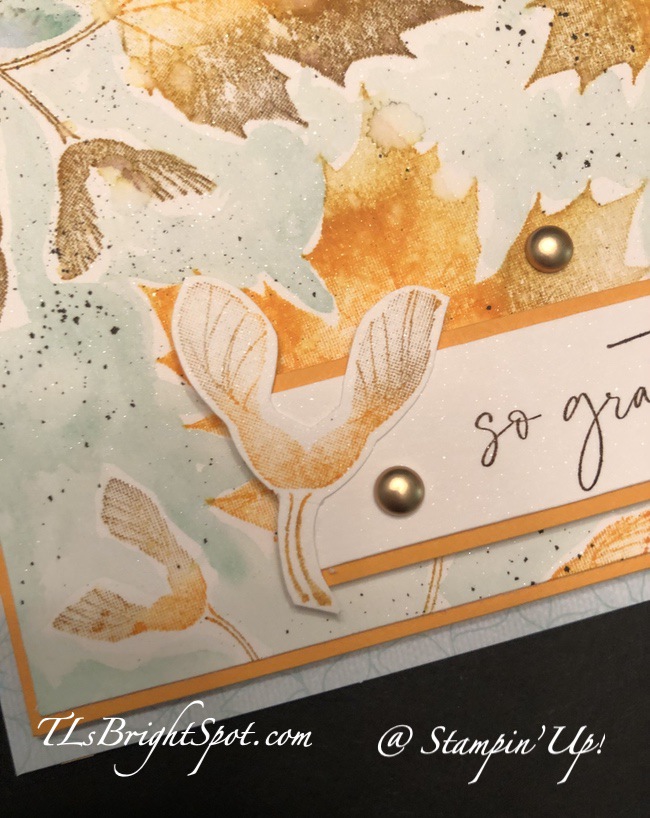
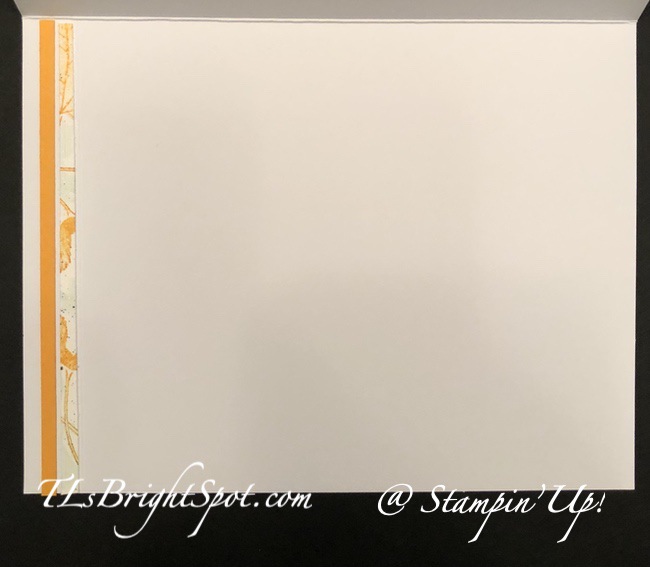
For the inside of the card I simply added some narrow strips of Mango Melody and the Shimmery White decorated piece I had cut down the original panel. I wanted lots of room for expressing my gratitude :O)

Stampin' Up!
Stampin' Up! Soft Seedlings Grateful.4

Now it is time to visit the others participating in the hop today. You may click the ‘next’ button to head over to Carol’s blog or click on a name to take you to their post. Happy hopping. Thank you for joining me!

Amy Koenders

Mary Deatherage

Kristi Gray

Jaimie Babarczy

Sue Prather

Akiko Sudano

Karen Ksenzakovic

Tara Carpenter

Terry Lynn Bright

Carol Buckalew

Please use my current host code: 4TMA4FZU and remember I offer Star-Studded Rewards (double rewards from Oct 3- 7, 2022). More about the rewards below :O) As a thank you to my customers I also offer a free item from Stampin’ Up! valued to $10 with your order of $50 and above. Click here to go my store. When the order is over $150, you still receive that free gift from me, but SU! has Stampin’ Rewards that may be used for additional products, so don’t use the host code at that time. If you have questions just let me know. If you would like to be able to order products early from catalogs AND enjoy that 20% discount, join my team now… you may do that here. WooHoo! We have lots of fun and are a creative bunch that encourages & supports one another. Would love to have you. :O)

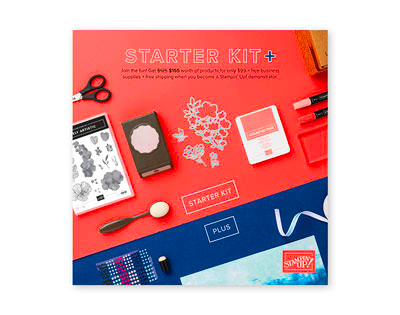
Stampin’ Up! has an awesome joining special right now – which makes me ask – why wouldn’t you join now?It’s a fabulous time to join Stampin’ Up! For a limited time, new team members will get even MORE FREE products in their customizable Starter Kit. Sign up between 4–31 October and you’ll get $125 USD | $165 CAD $155 USD | $206 | $135 CAD + free business supplies + all the fun being a part of our fantastic community!

Stampin' Up! Joining Special
Stampin' Up! Fitting Florets

This could be added to your joining items as a demonstrator – only available right now to demonstrators. As a demonstrator, this can be ordered Oct 4-31, same time frame as the joining promotion 😁

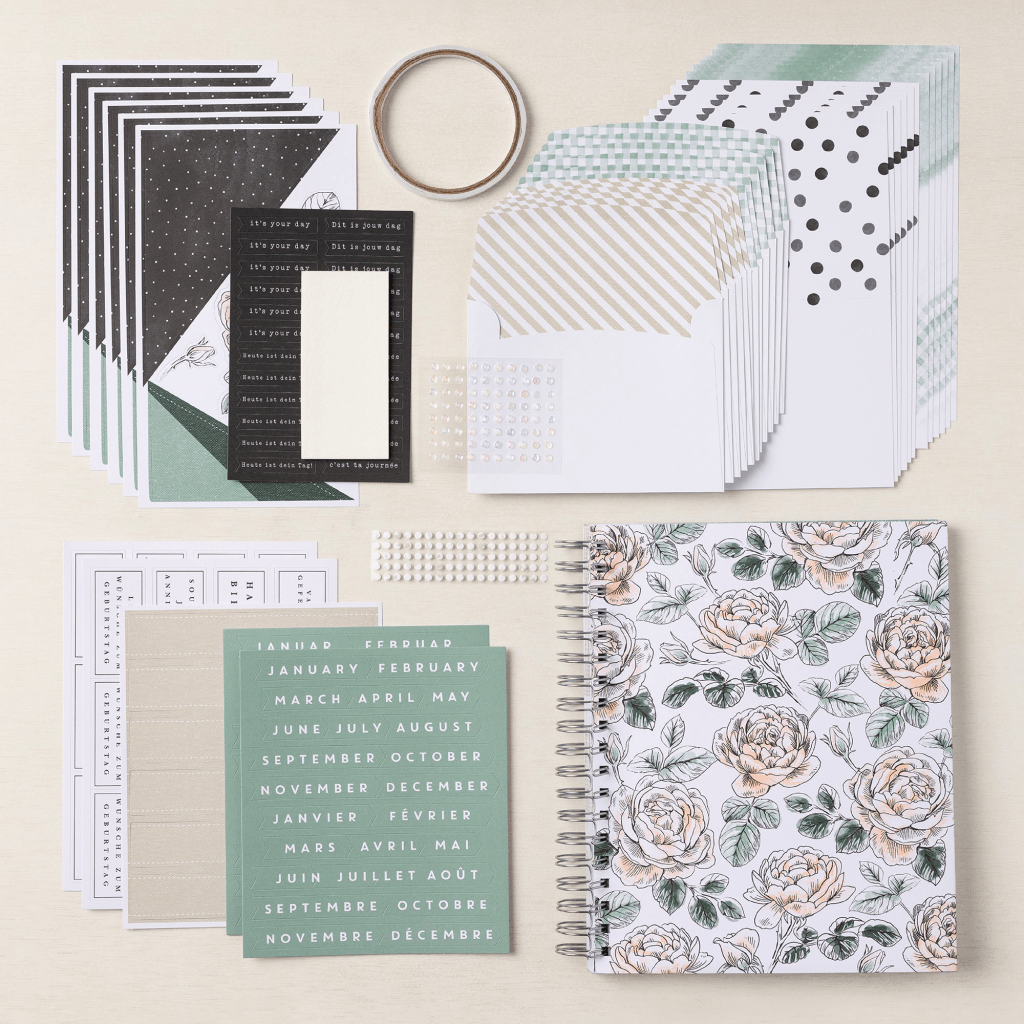
This is a nifty new birthday kit organizer that includes 12 cards to put together and a gorgeous notebook to list birthdays. What fun! and for only $25 US…

  • Kit includes one 8″ x 10″ (20.3 x 25.4 cm) monthly planner with space to record birthdays each month as well as a pocket sleeve to hold birthday cards.
  • Includes 12 full-size birthday cards, 6 of 2 designs, and 12 coordinating envelopes.
  • Includes Glue Dots, Stampin’ Dimensionals, Adhesive-Backed Embellishments, and Tear & Tape Adhesive
  • Includes die-cut florals and pieces ready for you to use­—no prep work required!
  • Includes sticker sentiments and die-cut labels in Dutch, English, French, and German
  • Coordinating colors: Basic Black, Evening Evergreen, Petal Pink, Sahara Sand, and Soft Succulent
Stampin' Up! Birthday Card Organizer Kit

161056

BIRTHDAY CARD ORGANIZER KIT

$25 USD | $34 CAD

The latest addition to the Kits Collection by Stampin’ Up! is a simple solution to gift cards and tags for the holidays! The Christmas Gifting Kit has everything you need to create gorgeous gift tags to attach to presents and gift card holders that adds a handmade touch.
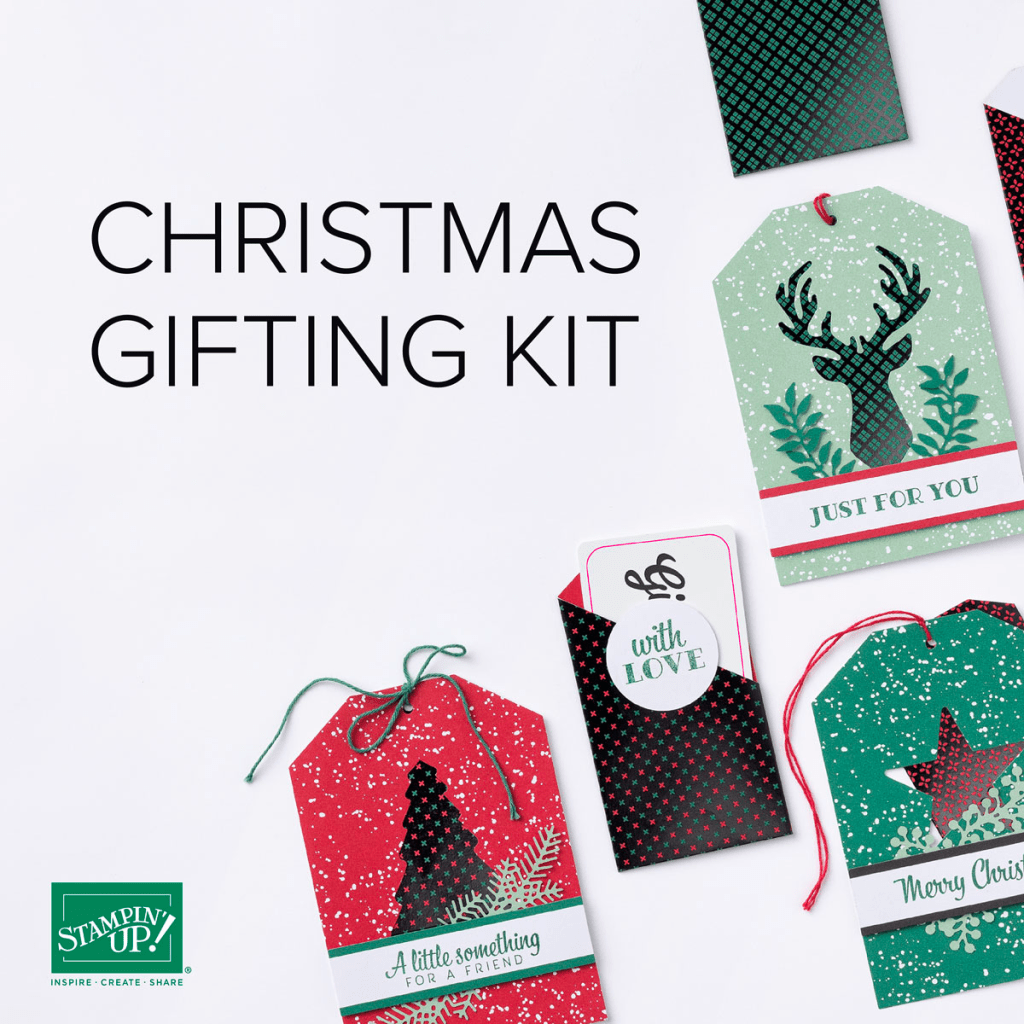
Stampin' Up! Christmas Gifting Kit

160342

CHRISTMAS GIFTING KIT

$21 USD | $29 CAD

Kit Includes:

  • Kit includes 9 tags and 9 gift card holders—3 each of 3 designs
  • Includes the exclusive Christmas Gifting Stamp Set and a Shaded Spruce Classic Stampin’ Spot
  • Sized to fit standard gift cards
  • Coordinating colors: Basic Black, black foil, Mint Macaron, Real Red, Shaded Spruce
Stampin' Up! October Paper Pumpkin Kit

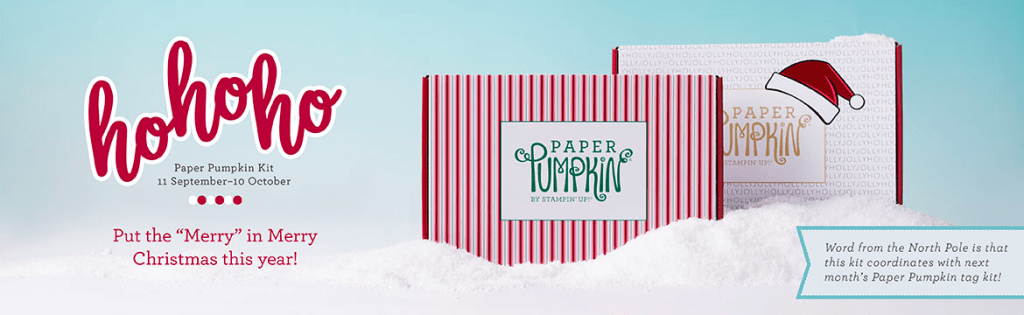
‘Tis the season to make your own Christmas cards with the Ho Ho Ho Paper Pumpkin Kit! This kit contains whimsical designs of Santa and his reindeer in a classic Christmas color palette which is sure to match various styles of holiday décor and look great on mantles everywhere. 
Each kit contains enough supplies to create 9 festive cards—3 each of 3 designs—and 9 coordinating envelopes. These cards are sure to bring the warm holiday spirit.  MUST BE ORDERED BY 10 OCT.

ABOUT THE KIT

Name: Ho Ho Ho

This kit includes:

  • Ho Ho Ho Photopolymer Stamp Set
  • Early Espresso Classic Stampin’ Spot
  • Printed card bases
  • Printed envelopes
  • Printed die cuts
  • Die-cut labels
  • Iridescent foil die-cut snowflakes
  • Vellum
  • Vanilla expoy dots
  • Adhesive dots
  • Mini Dimensionals

Card size: 4-1/4″ x 5-1/2″ (10.8 x 14 cm) 

Coordinating Stampin’ Up! colors: Bermuda Bay, Cherry Cobbler, Crumb Cake, Early Espresso, Shaded Spruce, Sweet Sorbet, Very Vanilla

Thanks for stopping by.

May you have a beautiful day.

Make someone happy sending them a handmade card filled with love. Now IS THE TIME TO JOIN – here.

Stampin’ Up! Seascape Thanks

Hello and welcome to my blog. We have had family visiting for several days, some of whom we have not seen in person since last August! Needless to say – my focus was on them… it was awesome BTW…

My card today is a thank you card featuring a couple of new products: the Seascape bundle and the Ombre Specialty DSP. Oh my, the DSP is just sparkly and variable in shade and easy on the eye :). And the seahorse in the dies ( Sea Life Dies) is beautiful, as is the coral. There are other dies in the set just as stunning, but these are what I used for this card.

Seascape Thanks.1

I began with a Balmy Blue panel that I ran through the Painted Texture 3D Embossing Folder. I used the wonderful Blending Brush to add some depth to this textured surface, begging with the lightest color to darker shades. By doing this, there is no need to change to a different Blending Brush. My colors were Balmy Blue, Misty Moonlight and Pacific Point, with the lighter colors at the top and getting darker as I moved down the panel. I next stamped the ‘sand’ in Crumb Cake ink at the bottom, then seaweed in both Garden Green and Old Olive inks. I then die cut the two shapes from the Ombre Specialty DSP, the coral in Mango Melody and the Seahorse in Night of Navy. It’s possible to see the shading more especially on the Seahorse in the photos. I added the seahorse with liquid glue, leaving the tail a bit loose so it could grasp a bit of the coral to keep itself from floating away:) The coral is added with mini dimensionals. The sentiment is from this same Seascape bundle and is stamped in Night of Navy ink on a Very Vanilla strip. Before stamping, I used the Lovely Labels Pick a Punch to create the one end. The sentiment is added with dimensionals, then Rhinestone Basic Jewels were added for the Seahorse eye and near the sentiment banner. This completed front panel was adhered to Crumb Cake with liquid glue, then dimensionals on the back of that to attach to the Night of Navy card base. And the card front was done!

Seascape Thanks.2

For the inside, on a Very Vanilla panel, I stamped the sentiment in Balmy Blue ink, then the bubbles in Night of Navy ink. The fish was stamped in Crumb Cake ink, then colored just a bit with the Pumpkin Pie Blends. This was adhered with liquid glue to a Crumb Cake piece, then right into the inside of the card n- and voila!

For the Very Vanilla envelope I chose the three small fishies to stamp in Pacific Point ink (stamped off once), then the bubbles in Balmy Blue ink. For the flap I pulled out the Whale of a Time 6×6 DSP (retiring end of Jun), adhered it with liquid glue and trimmed to fit. And bingo – this card is ready! Card cuts are listed at the bottoms of this post.

Products for todays project are from the 2021-22 Annual Catalog. They may be found in the list below. I’ve made it easy for you to simply ‘add all to cart’. If I can help you in any way to order these items, or others, please give me a holler. As a thank you to my customers, when the order is between $50-$150 I offer a SU! item of your choice valued at $10. Remember to use MY NEW HOST CODE – 4A6RJ2TA . When the order is over $150, you still receive that free gift from me, but SU! has Stampin’ Rewards that may be used for additional products, so don’t use the host code at that time. If you have questions just let me know. If you would like to be able to order products early from catalogs AND enjoy that 20% discount, join my team now… you may do that here. We have lots of fun and are a creative bunch that encourages & supports one another.

Stampin up has two promotions going on right now: a HOST promotion AND a KIT promotion, which are shown next.

HOST PROMOTION 4 MAY- 14 JUN, 2021

Connect, Craft & Collect

From 4 May–14 June 2021, qualifying orders will receive our generous Stampin’ Rewards PLUS additional rewards! Hosts can earn Stampin’ Rewards based on order totals for an entire party. Outside of the party setting, Stampin’ Rewards are available to those who place individual orders that meet the order totals shown here.

  • Workshop orders, customer orders, and online orders all qualify for the extra $25 in Stampin’ Rewards if they reach the $250 level.
  • The order must reach the qualifying amount of $250 in merchandise prior to shipping and tax.The extra $25 rewards are only valid once per order no matter how high the order total.
  • Starter Kit orders do not qualify for this promotion.
  • Stampin’ Rewards can not be used on a 50% off item.
  • Deadline to submit an order and receive the extra $25 in free Stampin’ Rewards:  June 14, 2021 at 11:50 PM (MT).

KITS PROMOTION BEGINS 1 JUNE

I’m excited to share with you a new line of creative products called the Kits Collection by Stampin’ Up! Stampin’ Up! has taken the guess work out of creativity and done the hard parts, and you get to do the fun stuff: craft! Each kit is all-inclusive and includes the predesigned projects, preprinted pieces, and even the adhesives you need to complete the projects.

There’s a wide variety of kits for all different occasions, and new kits are being added regularly. You can shop the current selection at www.stampinup.com/kits. But hurry! Kits are available only while supplies last! 

Pick the kit that’s right for you.

5.01.21_DHEADER_KITSPREORDER_NA

LOTS of information shared… if you have questions, please ask.

I want to help you in your creativity, to share in your progress, to witness your growth.

Card cuts for today’s project:

Night of Navy – 4 1/4 x 11 scored at 5 1/2

Crumb Cake – 4 1/8 x 5 3/8 (2)

Balmy Blue – 4 x 5 1/4

Very Vanilla – 4 x 5 1/4, 3/4 x 2

Ombre SDSP – Night of Navy 2 x 3 3/4, Mango Melody 3 x 2 3/4

Stampin’ Up! So Many Snowflakes Dies & Snow Wonder

Hello there! Today’s card features the extra gorgeous So Many Snowflakes Dies and I paired it with Snow Wonder stamp set for the sentiment on the front. What was extra fun was using the new SU! Blending Brushes ~ they are wonderful!!! And… they come in a 3-pack – eeeee. For some reason I cannot get my computer to allow me to share a photo of the brushes – but they are awesome… and will be available in the upcoming Jan-Jun 2021 Mini Catalog.

Now – to the card… here’s a sneak peek…

So Many Snowflakes Dies & Snow Wonder – #1

The how to :O)…

  • Die cut the largest snowflake from Whisper White card stock using the So Many Snowflakes Dies
  • Using that panel and one of the new Blending Brushes, tap the brush in Balmy Blue ink and blend the color, creating a shadow of snowflakes on the 4 x 5 1/4 panel of Whisper White card stock. Continue to cover, moving the snowflake ‘stencil’ around so there are several shadows on the panel. It should look something like this. Notice there are varying shades of the Balmy Blue ink.
So Many Snowflake Dies ‘stenciled’ panel #2
  • Cut an Adhesive Sheet to 4 x 5 1/4, peel the backing and adhere to a panel of 4 x 5 1/4 Whisper White card stock
  • Die cut several snowflakes of varying sizes using the So Many Snowflakes Dies and the Whisper White card stock with the Adhesive Sheet on it.
  • Remove the backing on the die cut snowflakes one at a time as you lay them on the ‘shadowed’ card front
  • Stamp the sentiment using the Snow Wonder stamp set in Balmy Blue ink on a 1 x 4 strip of Whisper White
  • Adhere this to a 1 1/4 x 4 strip of Balmy Blue card stock
  • Adhere the sentiment panel to the card front using dimensionals
  • Die cut yet another snowflake, this time from the Balmy Blue Glimmer Paper – love this paper! Adhere to the sentiment panel with a couple of dots of liquid glue.
  • Add some glittery Blue Adhesive-Backed Gems to several of the snowflakes
  • Adhere this panel to the Balmy Blue card base (4 1/4 x 11, scored at 5 1/2) and the card front is done.
So Many Snowflakes Dies & Snow Wonder – #3

The inside & the envelope…

You can see in the photo above and below that I used one of the die cut ‘outlines’ as a stencil, the Blending Brush and Balmy Blue ink. I did this on the envelope front and on the envelope flap. I also did it on the 4 x 5 1/4 panel of Whisper White for the inside of the card. Then I adhered one of the leftover die cut snowflakes that had adhesive on the back and placed it over one of the snowflakes stenciled on the panel. I liked the effect this created. This panel was adhered to the inside of the card base and voila…

The product list may be found below… Remember when shopping with me, if your purchase is between $50- $150, use my CURRENT HOST CODE…XS4MSSFN to receive a free SU! gift from me valued at $10!

Thanks for stopping by.

May you have a beautiful day.

Make someone happy by sending them a handmade card filled with love.