I am so excited to share this Fun Fold with you… it’s called a springboard fun fold and it’s from Susan Campfield, a SU! demonstrator.
Let me show you what it looks like ‘open’ and from the top.
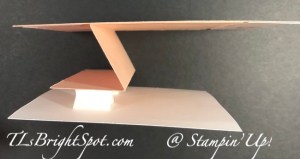
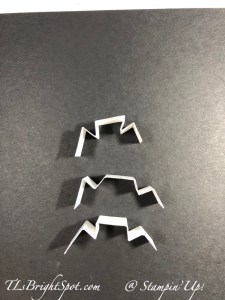
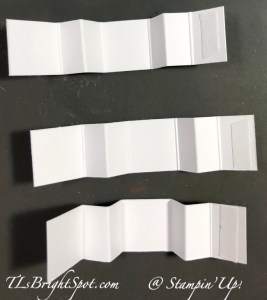
The photo at far left shows the completed card sort of lying open. The next photo shows an incomplete card from the top. The ‘springs” are on the additional accordion or z-fold of the card. And, here you can see one of the ‘springs’. The springs make the card a bit bouncy, which is fun. In the photo at left, the sentiment on the inside is also on a ‘spring’. Directions… oh, you want them, do you? :O)
Directions:
- Card base is 4 1/4 x 5 12 – (here I used Petal Pink)
- Layer 2 is same color of card stock cut 4 1/4 x 5 1/2 scored at 2 3/4 and 4 1/8. The first fold is mountain and the next is valley. Burnish.
- Cut a piece of DSP (here I used Delightfully Eclectic DSP) 1 1/8 x 4 and adhere to the left side of the card base, giving about a 1/4″ edge.
- Adhere Layer 2 so it is centered on the card base itself, giving about 1/8″ edge to the DSP
- Add a strip 1 1/8 x 4 to the card base on the right side, not overlapping Layer 2.
- HINT: the 1 1/8 x 4 strips could be an embossed panel or DSP
- Time to make the ‘springs’:
- cut 3 pieces 3/4 x 3 1/2 and score each the same: 3/4, 1 1/8, 1 1/2, 2 1/4, 2 5/8, 3. Each strip will look as though there are 2 m’s. Burnish.
- add tear n tape to the inside on the short end
- adhere over longer end slipping longer end to the fold line. Refer to photos
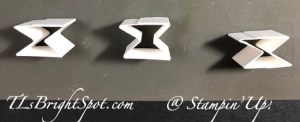
These end up looking like m’s adhered together :O) Attach 2 of these to the 2 1/8 end of Layer 2 so they are about 1″ from top & bottom of panel.
Now it’s time to put the rest of the card together.
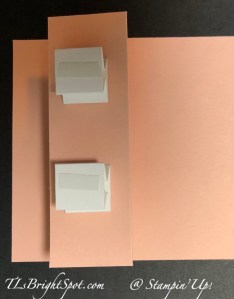
- Cut a piece of Delightfully Eclectic DSP 4 x 4 and adhere to a piece of card stock 4 1/4 x 4 1/4. My larger piece is Basic White.
- Without removing tear n tape on the two springs, place this front on the card base, centering it. Now you know it’s placement, attach to springs.
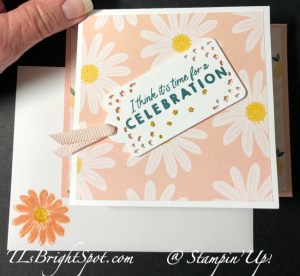
To complete my card front, I pulled out my Beautiful Balloons stamps and dies. On a piece of Basic White I stamped the sentiment in Pretty Peacock ink and die cut it with this very fun banner die from the Beautiful Balloons Dies. I added a length of Petal Pink ribbon from the Ribbon Combo Duo pack and attached it to the front panel with dimensionals. Notice the small stars on the banner? They were from die cutting the banner – I used my Crushed Curry marker to color them and with a dot of liquid glue added them below the sentiment. As an afterthought I added Wink of Stella to each star for a bit of sparkle. I thought it added the perfect touch. :O)
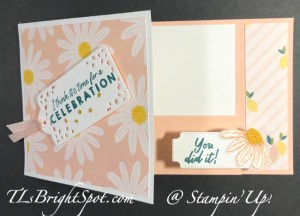
Now let’s complete the inside:
- Stamp the daisy from Cheerful Daisies stamp set in Petal Pink ink. Die cut the daisy with the appropriate Cheerful Daisy Dies.
- Die cut the daisy center using the Cheerful Daisy Dies from a piece of Crushed Curry and add to the daisy center.
- Stamp the sentiment from Beautiful Balloons stamp set in Pretty Peacock ink on a Basic White piece. Die cut with the pretty banner die from Cheerful Daisy Dies. Adhere die cut daisy to the banner with liquid adhesive.
- There is one more ‘spring’… attach it to the back of the banner, centering it. Add this to the inside of the card so that when the card is closed, the banner with the daisy does not show.
I also added a piece of 2 1/2 x 2 1/2 Basic White card stock above the daisy banner so I could write my message on it. This was such a fun card to create! I enjoyed making the fun fold and the springs add a fun touch of bouncy & lightheartedness.
OK, the envelope, which I kept easy, I stamped the daisy in Petal Pink ink using a stamp from, what else, Cheerful Daisies stamp set. The center is stamped in Crushed Curry ink using Cheerful Daisies stamp set. I used my Calypso Coral marker to add a few whimsical dots.
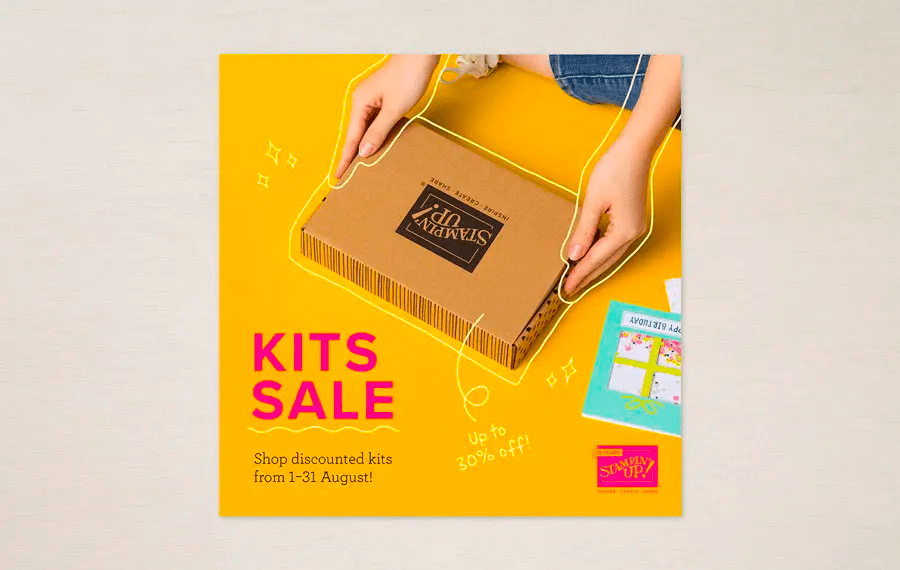
All the elements to make this card may be found by following my link – you may do that here to place an order – and yes, you would be ordering from me. Thanks so much! Having said that, there is more to share… Stampin’ Up! kits are on sale this month, so through 31 Aug. Some are as much as 30% off!
- Kits are fun, quick and easy, and all-inclusive so there’s nothing extra to buy and nothing to store afterward.
- Completing a kit gives everyone a sense of artistic accomplishment.
- Completed kits make great gifts. Make the projects and then give them away for someone else to use.
- Because kits come in so many styles and project types, there’s something for everyone. Want to HOST a kits collection party? Let me know and I’ll help pull that off. Kt together in September with kits on sale now. :O)
KITS COLLECTION BY STAMPIN’ UP! You can shop with me here.
Sales Period: 1–31 August
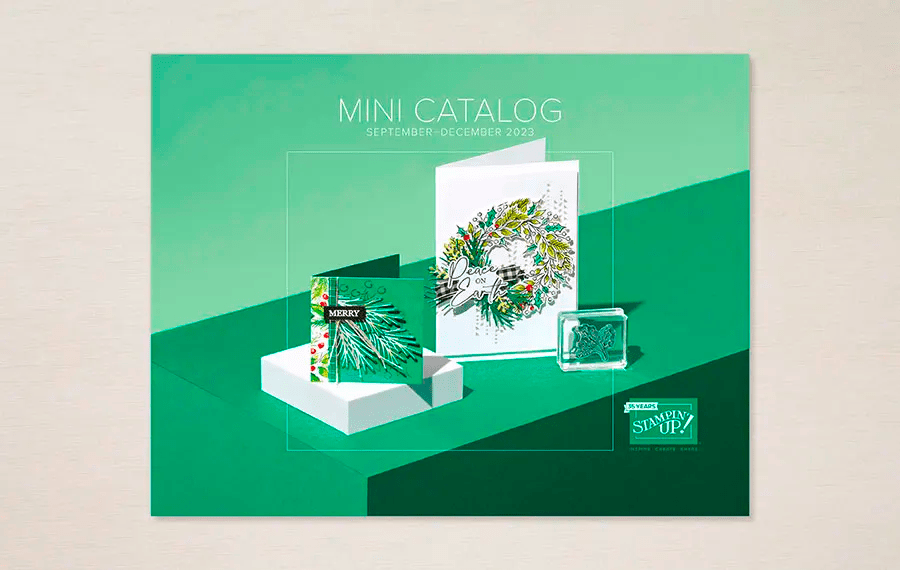
If you are one of my customers, you know the Mini September – December 2023 Catalog will be coming your way SOON! My shipment arrives at some point today and I have everything all set to send out to you. EXCITEMENT! Ordering from the new catalog begins September 6. And yes, I’m offering PAPER SHARES. There will be 80 sheets in all: one sheet of each design from the DSP offered in this catalog, cut into 6×6 size. The cost is $30 + $8.50 for priority mail shipping. How do I do this? I order all the DSP packs offered in this catalog and cut them down to size (6×6), bundle them and ship them off to you ASAP. I can’t place my order until Sep 6 though, so as soon as I get, get it cut down & packaged, off it goes to you by priority mail. It’s a perfect opportunity to see what paper you want more than others. Yes, you can order DOUBLE SHARES – that would mean cutting paper 6 x 12, except for those already coming in 6×6 size. That cost for Double Shares would be $60 + priority mail shipping.
FYI: Shipping can only go to addresses within the US. Please send an email to: tlsbrightspot@gmail.com. I’ll need: your name, yep, first & last are a must; an email connected to your PayPal account. (you do not need a PayPal account to pay the invoice, but I only accept PayPal.) Deadline to sign up for shares with me is September 4 @ 3PM ET. Let me know if you are interested.