
Good Saturday! What is new in your corner of the world? Now that it is just a bit cooler, hubby and I have been trimming bushes that desperately need it and doing some other yard work … consequently had to purchase some new tools as well. Interesting how tools wear out – just as we do! :O) Anyway – I’ve made a very clean and simple card for you today using the Peaceful Evergreen Dies and the Peaceful Season stamp set. As an FYI, each of these comes as a bundle for 10% savings and can be found in the Sep-Dec 2024 Mini Catalog pages 24-25.

This is pretty much an all white card except for the DSP strips for the tree. I love this clean look, but it is a bit on the plain side. Perhaps I should have run it through an Snowflake Sky 3D embossing folder. Next time! To make this card..
- Start with a 3 3/4 x 5 Basic White panel and die cut the largest tree using the Peaceful Evergreen Dies, centering it.
- Using the die cut tree, lay strips across it to your liking. I used the Take A Bow 6×6 DSP in 1/2″ wide strips. Adhere to the die cut.
- Place this tree on a 4 x 5 1/4 Basic White panel, using the cut out tree panel as a guide for placement. Adhere.
- Add dimensionals to the cut out tree panel and place on top, centering.
- Add to a Thick Basic White card base 8 1/2 x 5 1/2 scored at 4 1/4
- On a 1/2 x 3 3/4 strip of Basic White, stamp the sentiment in Real Red ink using the Peaceful Seasons stamp set. Adhere with adhesive only on the ends.
- Add embellishments of choice. Here I used the Cherry Cobbler & Pearl Adhesive-Backed Berries
- As a final touch I added this Granny Apple Green star at the top, die cut from Festive 12×12 Glimmer Paper.
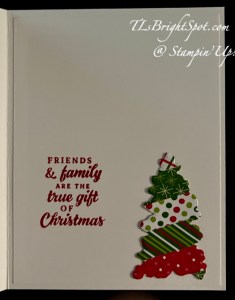
For the inside… I created another ‘strip’ tree in a smaller size laying the strips on a Basic White panel and die cutting with the smallest of the trees in Peaceful Evergreen Dies. I adhered this to the 4 x 5 1/4 basic White panel, then stamped the sentiment from Peaceful Seasons stamp set in real Red ink. I adhered the panel to the inside of the card and done…
For the envelope, I took a 2 1/4 x 6 piece of Take A Bow DSP and adhered it to the flap and that was it.
OK – how to get the items used to make this card…
Use this link to take you to the mini catalog and view all the awesome items available.
I appreciate your business and welcome any questions regarding sales or creating or joining my team. Make sure when shopping with me, that you see my name at the top as your demonstrator. That way I can send you a Stampin’ Up! giftie and you can earn rewards – with a $50 order or more. You also receive the monthly tutorial for that particular month – September is Autumn Expressions.
There are new kits available beginning Sep 4 – check by clicking here.
Scrapbooking… This is a digital-only scrapbooking brochure, full of scrapbooking essentials and exciting new products. As a companion brochure to the September–December 2024 Mini Catalog, the products inside coordinate with products from the mini catalog (and some online only products, too!). With Workshop Kits and some new product releases *hint* Two-Tone Cardstock *hint*, we hope this adds variety and inspiration to your and your customers’ holiday crafts this year! If you are into making memories – click here to see the products available in the Stampin’ Up! Scrapbooking Brochure.
Use my HOST CODE so I recognize you!
host code ZBAU6PKX
Thanks for stopping by. May you have a beautiful day. Make someone happy sending them a handmade card filled with love

That’s awesome Terry Lynn! Love the tree, great way to use up those pretty paper scraps! 🙂
LikeLiked by 1 person
Thanks Amy!
LikeLike