
Hello again… The other day I posted about the watercolor classes ~ and today I am following through with sharing a creation made using the emboss resist watercolor. It uses Fluid 100 Watercolor paper, re-inkers and a water painter… and of course VersaMark ink, White Embossing Powder and Heat Tool. 😁 Here’s the card…
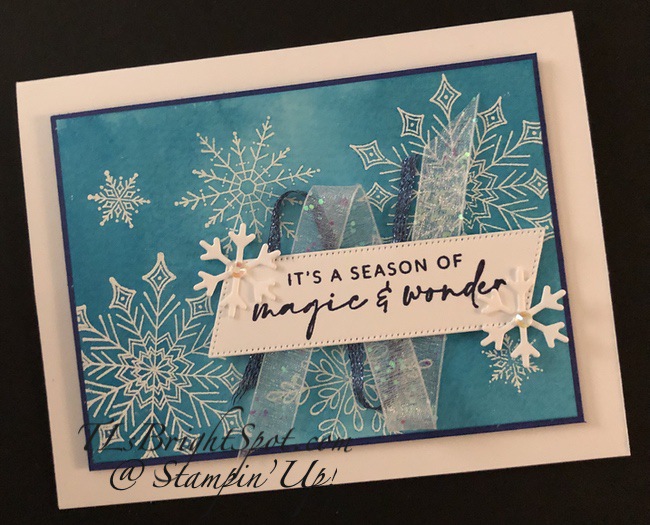
Begin by stamping the image (Joyful Flurry!) with VersaMark ink on Fluid 100 Watercolor paper. I used my Stamparatus and did several stamps at the same time. It was easy & efficient at the same time. I sprinkled with White Embossing Powder then heat set with the Heat Tool. I added more snowflakes to cover the full page. I let this cool while cleaning the stamps, then created a wash with re-inkers and an acrylic block. I put one drop of each color re-inker: Pacific Point, Balmy Blue and Pool Party. I mixed them together with the widest of the Water Painters, then brushed this liberally over the embossed snowflakes. If I needed more water, I simply squeezed the Water Painter just a bit for a drop to come through. Once I covered the sheet of embossed Fluid 100 paper with color, I set it aside to dry. This is when I created the sentiment banner & did die cuts of snowflakes.
I stamped the sentiment on a Thick Basic White scrap with Night of Navy ink, then die cut it with this fun banner die from the Frosted Flurry Dies. I die cut two small snowflakes using more dies in the Frosted Flurries Dies and adhered them to the banner with dots of liquid glue. Iran Stampin’ Seal+ on the back of the banner and attached two ribbons to it: first the Glittered Organdy Ribbon in white, then the Metallic Woven Ribbon in starry Sky. I liked the way they looked together, put dimensionals on the back of the banner and added it to the now dry embossed & watercolored piece. I added Iridescent Rhinestones Basic Jewels to the center of the two snowflakes and liked the look. I added aslightly larger piece of Starry Sky card stock to the back of the watercolored piece, put dimensionals on the back and attached it to a Thick Basic White card base. And the front was done…

On a Basic White panel I placed the snowflake die from Frosted Flurry Dies in the lower right corner. Notice it does not cut through the center… love the look… and because I did (love the look) I did the same in the upper left corner. I added a single Iridescent Rhinestones Basic Jewels to the center of each snowflake. I attached this panel to a slightly larger piece of Starry Sky card stock then added it to the inside of the card. Finis!

For the envelope I stamped the sentiment from Joyful Flurry stamp set on the front of the envelope in Balmy Blue ink. I then ran the envelope through the Wintry 3D Embossing Folder using the snowflake image. (This embossing folder has two narrow folders in the set and it is perfect for this particular card!)

Oh my goodness, how pretty Terry Lynn! Love the background that you’ve created, perfect colors! 🙂
LikeLike
Wow – that’s gorgeous – and making me wish I’d added that to a recent order! Wunnermus card and technique, TL! 🙂
LikeLike
Gorgeous card, TL! Thanks for all the great details!
LikeLike