Stampin’ Up! Friend Card with Wildly Flowering DSP

Good Monday! It’s turned cold again after a very beautiful day of 81 degrees – ah, that’s Spring. That 81 degrees made the hostas pop up, helebores are in full bloom (they love the cool!), daffodils & crocus are blooming as well. I really enjoy this time of year.

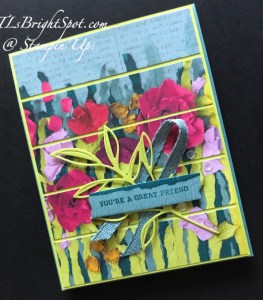
My card today is for a friend who isn’t feeling all that great, I’ve combined the Friends For Life Dies and the Wanted To Say Dies to create my messages – and the last of my Wildly Flowering 12×12 DSP.

Stampin' Up! Wildly Flowering Friend card front

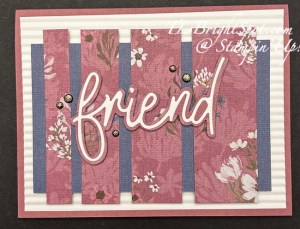
To make this card I began with my card base: Moody Mauve cut 8 1/2 x 5 1/2 and scored at 4 1/4. I layered a panel of Basic White 4 x 5 1/4 that I ran through a brand new Mini Corrugated 3D embossing folder, a new favorite. This piece was adhered directly to the card base. Next I cut a piece of the Wildly Flowering DSP 4 x 3, that coordinates with the strips of another piece of the Wildly Flowering DSP. This was cut 3 1/2 x 3 1/2, then into strips 1/2, 3/4, 1 & 1 1/4. I spaced then evenly along the 4 x 3 panel & adhered with Stampin’ Seal. I took a scrap of the Wildly Flowering DSP 4 x 2 1/2 & die cut the background for the word ‘friend’ from the Friends For Life Dies. Next I took a piece of Basic White 4 x 2 5/8 and covered the back with Adhesive Sheets. I then die cut the word ‘friend’ from that, removed the backing of the Adhesive Sheet and attached it to the DSP background die cut. I put this on dimensionals and adhered it over the DSP strips, added dimensionals to the 4 x 3 DSP panel and attached to the card front. As a final touch, I added five (5) Adhesive-Backed Textural Dots and the card front was complete.

Stampin' Up! Wildly Flowering Friend card inside

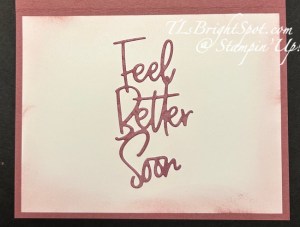
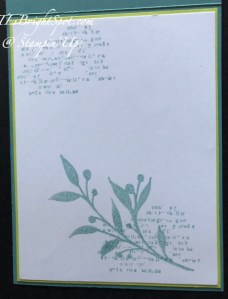
For the inside, I took another piece of the Wildly Flowering DSP in Moody Mauve, 2 1/2 x 3 1/2, attached aAdhesive Sheet to that & die cut the sentiment from the Wanted To Say Dies. I attached this to the center of a Basic White piece 4 x 5 1/4. I then used a Blending Brush & Moody Masuve ink to add some color to the edges of this Basic White panel, then attached it to the inside of the card.

Stampin' Up! Wildly Flowering Friend Card & envelope

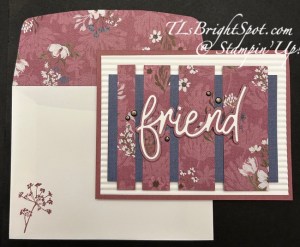
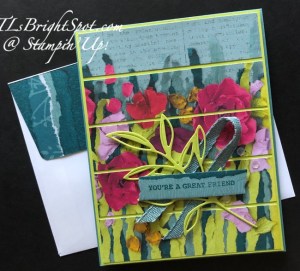
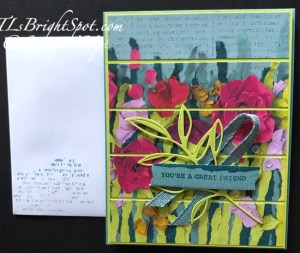
For the envelope, more Wildly Flowering DSP, 2 1/4 x 6, attached to the flap & trimmed to fit. A simple flower from the Wildflower Designs stamp set was stamped in Moody Mauve ink on the envelope front. Done, ready to send in hopes my friend will ‘feel better soon’!

The 2024-2025 Annual Catalog is quickly coming to an end – and the 2025-2026 catalog will be released soon. I believe this Wildly Flowering DSP is on the Last Chance List. Tomorrow, the list will be updated with all the retiring items and I’ll include it in my post. If there is something you want, get it quickly as once it is gone, it will not be replaced. Use my host code below to receive benefits from me when you purchase is $50 & up… a SU! item valued up to $10 & the monthly tutorial.

HOST CODE Y3TPZVYN

The 2025-2026 Annual Catalog will be released May 6. Items from that catalog can be viewed then, but not until then :O) – unless you are a Demonstrator, then that’s different. Preorders for demonstrators have begun. Want to be a demonstrator and always get at least 20% off each order? Sign up with me now & you will be able to order items for your Starter Kit from the new catalog. For $99 you will be able to order $125 worth of products. click this link, then the join menu :O)

Inked Occasions Paper Pumpkin

Subscribe March 11 – April 10

Subscribe March 11 – April 10

Stampin' Up! Inked occasions PP

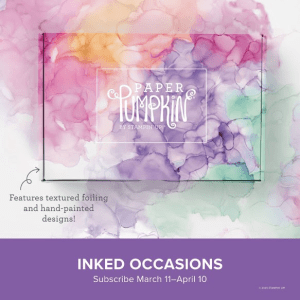
I’m extra excited about this particular PP. We had something similar in the past & it was gorgeous – looking forward! Craft stunning cards with hand-painted, alcohol ink designs!
• Makes 9 cards: 3 each of 3 designs with 9 coordinating envelopes
• Textured gold foil on the card bases and sentiments
• Precut paper pieces and butterfly embellishments
• Coordinating colors: Berry Burst (Classic Stampin’ Spot), Flirty Flamingo,
Fresh Freesia, Gorgeous Grape, Peach Pie, Pool Party

Cards come in a beautiful coordinating box!

Subscribe to the April Paper Pumpkin Kit between 11 March and 10 April by clicking here.

Thanks for stopping by. May you have a beautiful day!

Stampin’ Up! You are Remarkable Friend Card

Stampin' Up! You Are Remarkable Fieind card front

It is amazing what one finds when tidying their desk! That would be me :O) What I found is this pretty piece of watercolor paper and I decided not to set it aside any longer. I stamped this gorgeous image of the flower from the You Are Remarkable stamp set – in Secret Sea ink – one of the new In Colors available May 6. This is a two step stamp, so the flowers have a ‘filler’ stamp and I used Melon Mambo ink for that; again the leaves have a ‘filler’ stamp and I used Granny Apple Green; and finally, the center is a stamp that is Crushed Curry ink. I stamped the sentiment, also from the You Are Remarkable stamp set, in Secret Sea ink. I adhered this panel to Melon Mambo card stock, giving it a small border, put dimensionals on that and adhered to a 4 x 5 1/4 Secret Sea panel die cut with the largest Textures Notes Dies. This was adhered directly to the 8 1/2 x 5 1/2 card front, scored at 4 1/4 of course. Two steps more for the card front – Wink of Stella on the flower – petals & center and three Iridescent Pearls Basic Jewels scattered in a bit of triangle.

Stampin' Up! You Are Remarkable Friend card inside

For the inside… I used the second largest die from Textured Notes Dies – again available May 6 – and Basic White card stock, to die cut the inside panel. I then stamped the very cute bee buzzing in Secret Sea ink.

Stampin' Up! You Are Remarkable card & envelope

The envelope… Another sweet buzzing bee stamped in Secret Sea ink in the front and another of the same flower stamped on the flap, just a portion of it though – with same coloring as the card front. Silly me did not photograph that! :O(

The stamp set, Secret Sea ink and dies will all be available May 6. The other products are in the annual catalog.

Thanks for stopping by. May you have a beautiful day!

Stampin’ Up! Masterfully Made Suite

Oh goodness, I just played with a new suite of products and didn’t want to quit… This Majestically Made DSP is just beautiful: love the colors and the variety of patterns. And the Majestically Made stamp set & dies are beautiful. I chose to make a top fold card using the Lost Lagoon card stock and Lemon Lime Twist for contrast.

Stampin' Up! Majestically Made Suite

I cut a panel of DSP 4 x 5 and made five 1 x 4 pieces. I added these to a 4 1/8 x 5 3/8 panel of Lemon Lime Twist While this ribbon is not part of the suite of products found on pages 102-103 in the 2023-2024 Annual Catalog, I decided a simple fold over and adhered with a couple of glue dots. I die cut this gorgeous leaf using the Masterfully Made Dies and lemon Lime Twist card stock. I adhered the leaf in place with glue dots as well. I stamped the sentiment in Pretty Peacock ink on a scrap of the Masterfully Made DSP and die cut it with the banner die from Masterfully Made Dies. I added it over the ribbon & die cut leaf with dimensionals. For final touch I added three Adhesive-Backed Sequins Trio in White – also a part of this suite. This entire panel was added to the Lost Lagoon card stock with dimensionals.

Stampin' Up! Masterfully Made Suie, inside

For the inside of the card, I used Lost Lagoon ink and the Masterfully Made stamp set and randomly stamped the ‘wording’ stamp in second generation ink. I then stamped the large leaf from the same stamp set in the same second generation manner with Lost Lagoon ink. I adhered this to a panel of Lemon Lime Twist, then into the inside of the Lost Lagoon card base.

Stampin' Up! Masterfully made card & envelope.1
Stampin' Up! Masterfully Made card & envelope.2

For the envelope… a left over piece of the Masterfully Made DSP for the flap and for the front, more of the stamped off ‘words’ in Lost Lagoon ink from the Masterfully Made stamp set. And the set was done. Love it!

I’m not sure how Stampin’ Up! does it, but the Designer Series Papers seem to get better & better and… I have learned to USE THEM not HOARD THEM :O) One of my problems though, is I want to just play with one set at a time and there are so many new ones I haven’t played with yet!!! Ah, time.

If you do not have a demonstrator and would like to order from me or need a catalog, I would like to help you create. When ordering $50 or more in product (before shipping/ taxes), use my HOST CODE 64NDVS4D to receive Star Rewards and a SU! gift valued to $10. Star Rewards build up so that when you have 8 rewards from me, you can receive a stamp set valued to $40. :O) And when your order is $50 or more prior to shipping/ taxes, you also receive the monthly tutorial. :O)You may order from me here.

Thanks for stopping by! may you have a beautiful day.

Stampin’ Up! Wisteria Wishes Fence Card

I have a pretty card for you today, using a retiring stamps and dies. It’s called Wisteria Wishes, but they are made into Lupine instead :O) And I confess (confession is good for the soul), the design is from a demonstrator in Australia, Gail Ellis. We made this in card class Thursday.

Stampin' Up! Retiring Wisteria Wishes
Stampin' Up! Wisteria Wishes card inside.

I’ve used Basic White Thick card stock for the card base, fence posts, flowers & stems. Soft Sea Foam card stock was used for the die cut leaves. Inks were Orchid Oasis and Soft Sea Foam.

Begin with a card base 8 1/2 x 5 1/2 scored at 4 1/4. Remove 4 -5/8 x 5 1/2″ strips from the card front and set aside. Die cut 6 ‘posts’ using the long banner die from the Harvest Dies. These dies and coordinating stamp set, Quiet Meadow, are carrying over to the new 2023-2024 Annual Catalog.

Close the card with the short front side facing up. Place a long length of washi tape or something similar, and with the sticky side up, attach in the center of the short front side. The tape should form a sort of ‘T’ when looking at the card front. Lay a 5/8 x 5 1/2″ strip so it aligns with the card back and sticks to the tape. Place two other lengths in between the spacing of the short front and bottom edge of the front. It is helpful to have this card on a grid paper to keep everything straight. Adhere the two outside posts to the ‘fencing’. Once this is done the card will be much more stable. :O) When adhering the posts, I did not use the full length of the post. It should be about 5/8″ up on the card front and about 3/8″ from the edge. Remove the sticky tape and adhere the center post. Turn the card over and adhere three posts on the inside. Cut off the overhanging edges of the ‘posts’. That was the hard part! The rest is pretty easy.

Stamp the set of three wisteria flowers in stamped off Orchid Oasis ink. Stamp the detail stamp in full strength Orchid Oasis ink.. Do this twice so there are two sets of blooms, then die cut with the Wisteria Dies.

Stamp the stems in Soft Sea Foam ink, also twice, and die cut with the appropriate die from Wisteria Dies. Adhere the first set of stems to the far right edge of the card and attach with with liquid glue. Attach one set of blooms with dimensionals overlapping the stems. Use the photo for reference. Adhere the other set of stems with liquid glue. Note placement by referring to the photo. Adhere second set of blooms, also with dimensionals, overlapping as necessary.

Die cut the sentiment banner from Basic White Thick card stock. Stamp the sentiment in Orchid Oasis ink. (The sentiment I chose required me to tape off a portion of the sentiment, ink, remove tape and stamp on the banner.) Adhere banner in place with dimensionals.

Leaves: I die cut three bunches of the leaves from Soft Sea Foam card stock, then used a sponge dauber and Soft Sea Foam ink to darken areas of the leaves. I trimmed down the second bunch of leaves: one branch to fit under the sponged leaves and another to fit on top. Again, refer to photo for placement. I added retiring 2022-2024 In Color Matte Dots in Orchid Oasis and the front was complete.

For the inside… on a 4 x 5 1/4 in panel of Basic White, I adhered the third branch of leaves to the far upper right. I wanted to make sure, it would be covered by the largest part of the card front. I stamped the rest of the sentiment in Orchid Oasis ink. Just as before, I taped off what I didn’t want, inked the stamp, removed the tape and stamped on the panel. This was adhered to the inside of the card & voila! Love, love, love!

Stampin' Up! Last Chance Products

Click on the Last Chance icon above to see the list of what is still available. Last Chance products are only until May 1, then go away.

GO TO MY ONLINE STORE AND ORDER…order from me here

SHOP CLEARANCE RACK HERE. This is really the way to save! The items in the Clearance Rack are highly discounted.

USE MY CURRENT HOST CODE K4PPCYJA

Stock Up Now Because Prices Are Increasing – As of May 2nd, prices will increase with the new Annual Catalog. Right now is the best time to stock up on basics and carryover products. New prices will be in effect (including for all catalog-related promotions, such as the catalog preorder) within the following product categories:

  • Cardstock
  • Designer Series Paper
  • Specialty Paper
  • Notecards and Envelopes
  • Classic Stampin’ Ink Pads and Refills
  • Stampin’ Blends
  • Stampin’ Write Markers
  • Select Specialty Inks
  • Stampin’ Cut & Emboss Machines and plates
  • Embossing Folders
  • Punches
  • Take Your Pick products
  • Storage
  • Clear Blocks
  • Select tools
  • Select adhesives
  • Select stamp sets
  • Paper Pumpkin

When you place an order of $50 or more (before shipping & taxes), you receive from me a SU! item valued up to $10 + Star-Studded Rewards. If your order exceeds $150, do not use my HOST CODE as SU! has it’s own rewards from which you may choose. You will still receive that FREE ITEM from me up to $10 + the Star-Studded Rewards.  And if your order is $50 or more I will also send you my monthly class tutorials. BONUS! :O)

USE MY CURRENT HOST CODE K4PPCYJA

THANKS FOR STOPPING BY. MAY YOU HAVE A BEAUTIFUL DAY!

MAKE SOMEONE HAPPY SENDING THEM A HANDMADE CARD FILLED WITH LOVE.