Hi folks ~ it’s time for another Happy Inkin’ Thursday Blog Hop. If you’ve come from the talented Tara Carpenter, welcome to my blog. The theme this week is Christmas and I’ve chosen to do a sort of flap card that can also be used for a gift card. It’s super easy to do and the Painted Christmas DSP is perfect on the card.


Aren’t the colors wonderful in this DSP? I love all the shades of green with the sparkle of Red Rhinestone Basic Jewels. Notice how the tip of the flap goes into the corner? If you decide to insert a gift card, simply leave the card front free & not insert it into the corner piece. It works just as easily either way. Now for directions…
Basics:
- Cut the card base to 4 1/4 x 11 and score at 5 1/2, then remove a panel 2 3/4 x 4 1/4. Save this panel for the flap. 🙂 I used Evening Evergreen for this. Cut a 2″ square then trim it diagonally point to point and set it aside.
- Cut the next layer: 2 5/8 x 4 1/8 ( cut 2), 4 1/8 x 5 3/8 for the inside. I used Pear Pizzazz for this step.
- Cut DSP panels: 2 1/2 x 4 (cut 2 coordinating pieces). I used Painted Christmas DSP and simply turned one of the panel to the other side.
- Stamp the sentiment on a Basic White piece with Garden Green ink and the Christmas to Remember stamp set. Die cut the panel with the Seasonal Labels Dies.
- Stamp leaves from the Christmas Season stamp set, both in Pear Pizzazz and Soft Succulent inks on Basic White scraps. Die cut with the Seasonal Labels Dies.
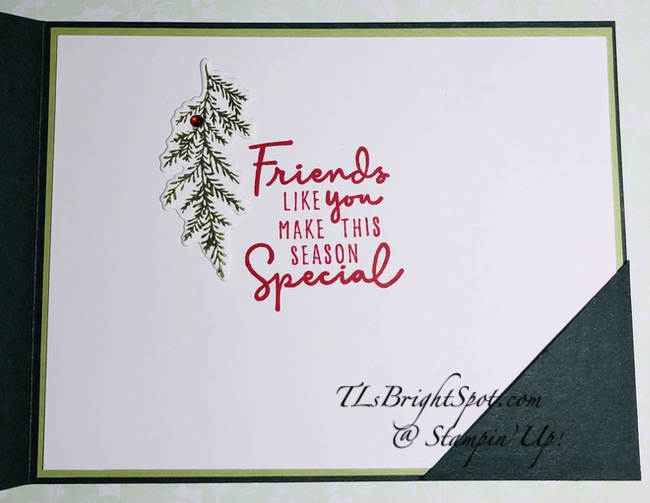
- Stamp the inside Basic White panel with Real Red ink using the Christmas to Remember stamp set, centering the sentiment. Keep in mind the placement for the sentiment as it needs to ‘hide behind’ the front flap of the card.
- Stamp the envelope while you’re at it – so all the stamping is done. I again used Real Red ink and the sentiment from Christmas to Remember stamp set.
Now let’s put this together…
- Adhere the Pear Pizzazz panels to the card: front panel, flap panel and the inside of the card.
- Adhere the DSP panels: front panel & the flap panel. Remember to reverse one side for contrast.
- Adhere the inside sentiment panel.
- Adhere the diagonal panel (Evening Evergreen) to the lower right corner with Tear n Tape cut in half lengthwise. Attach the Tear n Tape to the bottom of the diagonal and the right side. Because of the layers this piece needs to be held firmly in place, bottom and side, but still allow the flap to be inserted. Remember if you do not want to insert the flap it can be used for a gift card. You also do not have to add this piece!
- Add the flap panel to the front, centering it. This will be about 1/2″ from the fold and 3/4″ from the top. I use my grid paper to keep things straight.
- Attach the front sentiment with dimensionals. Add the die cut leaves with liquid glue. I slipped one under the front sentiment. The other I attached to the banner itself: glue on the portion on the banner & dimensionals on those off the banner.
- Add three Red Rhinestone Jewels to the flap.This added color just brings the card to life!

You can see here that I die cut another of the fronds and added it to the side of the sentiment. It brings the design of the DSP inside and brings the theme all together. I attached another Red Rhinestone Basic Jewel to bring more glam to the inside ~ and love it!.

I added another piece of the Painted Christmas DSP to the envelope flap & trimmed it to fit. And the Merry Christmas sentiment was stamped in the beginning when all stamping was done.
What do you think? Fun, easy card and it could be created in multiples if you wanted to. Change the card base, change the DSP, change the sentiment, leave the diagonal panel for the gift card or don’t add it. Lots of options. And there’s no waste – you use all the pieces of the original cut of the card base ~ another plus!
Not have a demonstrator so you can order? If you do not have a demonstrator and need an Annual 2021 Catalog OR Jul-Dec 2021 Mini Catalog, please reach out to me – happy to send one to you. Please also use my current host code when ordering: 62EHPGHC I offer my customers a free item from Stampin’ Up! item valued to $10 with your order of $50 and above. Click here to go my store. When the order is over $150, you still receive that free gift from me, but SU! has Stampin’ Rewards that may be used for additional products, so don’t use the host code at that time. If you have questions just let me know. If you would like to be able to order products early from catalogs AND enjoy that 20% discount, join my team now… you may do that here. We have lots of fun and are a creative bunch that encourages & supports one another. Would love to have you!
Now it’s time to move on to see all the wonderful creations this week. You may click on the name or use the next button to go to Amy Koenders.
Terry Lynn Bright
Thanks for stopping by. May you have a beautiful day. Nothing beats a handmade card.
Inspire. Create. Share.


Leave a comment