
Hello! It’s Saturday and I have a couple of ladies coming over to make a fun project or two today. Yes, we’ll be wearing masks AND physically distanced – it’s part of what we have to do to be able to craft together. The main project is a mini pizza box all decorated in Berry Delightful DSP and using the Strawberry Punch in coordination with the Sweet Strawberry stamp set. I never knew strawberries could be so easy so make in 3D. What? yes, 3D! I’ve decorated the top and simply added paper to the sides and front to give it a very finished, polished look – perfect for gift giving. Let’s take a peek…
Box – #1
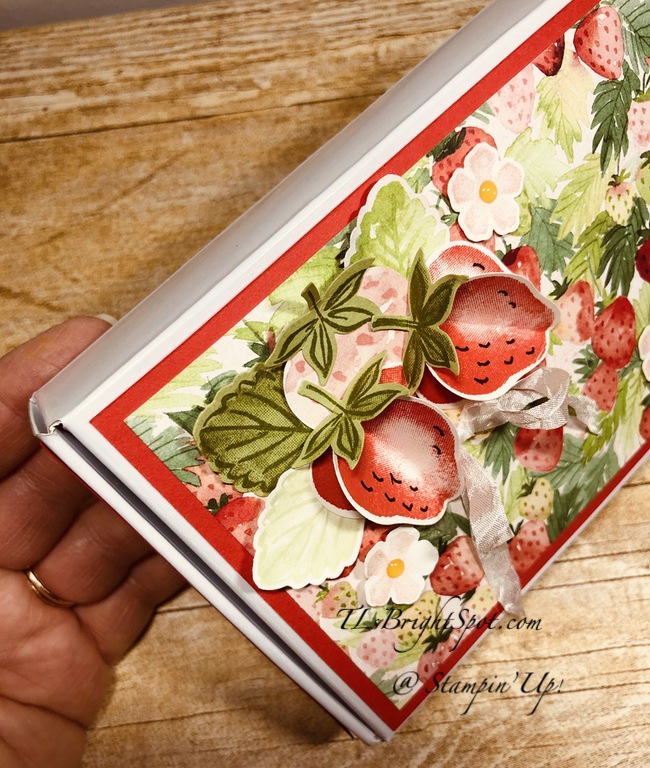
I love this paper and because of the paper, it gives ideas on other colors for the strawberries – such as the one in the lower right corner. It looks like a strawberry not yet ripened. :O) And, did you notice those on the paper in that color too? Yep… pretty cool. And, in lieu of using the stamp for the seeds, I drew in the seeds with a marker. I love how it turned out. And do you see how it has just a bit of dimension? I put a half dimensional (you could use a mini dimensional as well) just under the top of the berry and adhered the bottom of the berry with liquid glue. All right, let’s take a closer look at the rest & give you more detail.

The background paper on all the sides is Poppy Parade. The next layer is, of course this gorgeous Berry Delightful DSP. Card cuts will be listed at the end of the post. The pink strawberry was punched from one of the papers in the pack and the cap for each strawberry was stamped in on Pear Pizzazz card stock, sometimes using Pear Pizzazz ink and sometimes using Garden Green ink. The leaves… the lightest one is stamped in Soft Sea Foam on Basic White card stock. And this is a two part stamp, background and detail. I tend to stamp the background first, then the detail. Oh, and one of the leaves is stamped from the Designer Series Paper. And the super sweet flowers are stamped in ‘stamped off’ Blusing Bride with a 2020-2022 In Color Enamel Dot for the center.
Let’s see if I can tell you how to do the 3D strawberries… stamp two berries, add the seeds with a Black Marker, fine tip, and punch out with the Berry Builder Punch, fold one in half and adhere with liquid glue to the center of the other berry – running the glue along the fold of the one berry. Press it then let it set for a bit. Prepare the other berry the same way. While those are drying, prepare the caps of the berries: in this case stamp the outline of the berry first then the filler. Make certain the filler is stamped off! Punch with the Berry Builder punch. To glue on the cap… fold the stem up, adhere glue along the top of the berry, just a line of glue and adhere the cap, making certain it is even with the back of the berry. You could easily lay it on a silicone sheet right after putting on the cap – that’s what I did. Now prepare the sweet flowers… stamp in stamped off Blushing Bride ink on Basic White card stock and punch with the Berry Builder punch.
Now let’s put it together… curl the leaves a bit on the very ends. I adhered two of them with liquid glue. The leaf on the far right has a mini dimensional under the curled end of the leaf, then li8quid glue on the the stem of it. The pink berry got a mini dimensional under the top of the berry and the tip of the berry was adhered with liquid glue. The 3D berries were adhered with liquid glue. Two of the flowers were adhered with a glue dot; the one on the far left with a mini dimensional. For a final touch I added the sweet bow – 1/4″ Crinkled Seam Binding.


What a fun project… and this can be filled with candies or with coordinating Notecards & Envelopes – imagine that! I’ll include the info for purchasing those in the product list – just in case you are inspired to those as well 😏 The Berry Delightful DSP is part of the $100 FREE items available during Sale-a-bration.
Products for todays card are from the new Jan-Jun 2021 Mini Catalog ~ and those products are available now for purchase. You will find them in the product list below. As a reminder… I’ve made it easy for you to simply ‘add all to cart’. If I can help you in any way to order these items, please give me a holler. As a thank you to my customers, when the order is between $50-$150 I offer a SU! item of your choice valued at $10. Remember to use MY CURRENT HOST CODE RSVNH4XW- good Jan 5-20. When the order is over $150, you still receive that free gift from me, but SU! has Stampin’ Rewards that may be used for additional products, so don’t use the host code at that time. Now is also Sale-a-bration – a time from now through the end of February when Stampin’ Up! offers FREE items with $50 and $100 purchases. Those products are shown below today’s product list as well.


Sale-a-bration items FREE with a $50 purchase


Sale-a-bration items FREE with a $100 purchase


Card Cuts for todays project:
Poppy Parade ~ 3 5/8 x 5 3/8; 2 @ 3/4 x 3 5/8; 1 @ 3/4 x 5 3/8
Berry Delightful DSP ~ 3 3/8 x 5 1/8; 2 @ 1/2 x 3 3/8; 1 @ 1/2 x 5 1/8
Leaves & berry caps ~ scraps of Granny Apple Green & Soft Sea Foam
Strawberries, flowers ~ scrap of So Saffron, Basic White strips 1 1/2 w x various lengths

Leave a comment