
So sorry for the late post – hubby and I bought a fresh cut tree yesterday and it was extra heavy- it took both of us to carry it in and get it set up. Then lights, etc…. No, not done yet; hubby is still working on the lights. I’ll share a picture Monday as we won’t get it done until late Sunday afternoon. 🌲🎄🤶🏻
Such fun making this card… an easel card – which I haven’t made in some time. One of my teammates sent an easel card and I was inspired to create several.

I love the bling from the Balmy Blue Glimmer Paper. Hear are details on how to do this…
- Cardstock base is 8 1/2 x 11, scored at 4 1/4 (this happens to be Misty Moonlight, but I also used Pacific Point card stock which coordinates with the DSP. When I used Pacific Point card stock, I also used Pacific Point ink.
- Use your paper trimmer to make two cuts JUST TO THE SCORE LINE on the card front: 1 1/2 & 4
- Fold the center portion in half and burnish well with your bone folder. This becomes the stand up on the card.
- Cut 2 strips of Snowflake Splendor DSP and adhere with liquid glue to the side panels
- Cut 2 additional panels of coordinating Snowflake Splendor DSP and adhere with liquid glue to the center folded panel, one piece above the fold, the other below it. NOTE: I think it looks best if these pieces are cut so the pattern on the DSP matches top to bottom panels
- Cut a panel of Whisper White and adhere to the INSIDE of the card, centering
- Adhere side panels to card base with liquid glue.
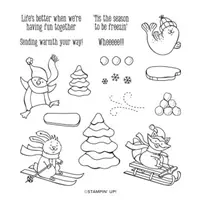
- Stamp the sentiment from Freezin’ Fun stamp set in Misty Moonlight ink on Whisper White. Punch out with the Classic Label Punch. Adhere to a strip of Misty Moonlight with liquid glue. Put dimensionals on back and adhere to the Whisper White panel, about 3/4″ from bottom. This creates the easel :O) and allows the upper panel to stand up.
- Punch a starburst with the Starburst Punch (OOPS! retired item 😞)and Balmy Blue Glimmer Paper
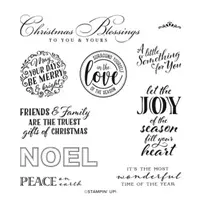
- Stamp the sentiment from Wrapped in Christmas in Misty Moonlight ink and punch with the 1 1/2″ circle punch. Adhere to the Glimmer paper. NOTE: by scrapping some of the ‘glimmer’ away the paper will adhere more readily. Add liquid glue to that area and bingo, the sentiment adheres.
- Put dimensionals ON THE LOWER HALF of the Glimmer Paper and attach to the lower center panel near the fold line. Because the lower sentiment is on dimensionals, this allows the upper portion of the card to ‘stand’.

I have made several of these, which I don’t usually do, but they were fun and easy and look pretty neat. Notice how the color variations in the DSP make the cards look so different. Hope you enjoyed this design. Card cuts will be listed at the end of this post. Let me know if you have questions.


Card cuts:
- Card base: 8 1/2 x 11, scored at 4 1/4: top of the card cut to score line at 1 1/2″ and 4″
- DSP strips for side panels- 1 3/8 x 4 1/8 (cut 2)
- DSP panels for folded area – 2 3/8 x 2 (cut 2)
- Whisper White – 3 x 4 1/4 + banner sentiment + circle sentiment
- Misty Moonlight / Pacific Point for sentiment banner 2 1/4 x 5/8
- Glimmer paper – use circle dies for 1 3/4 or slightly larger frame for circle sentiment
Thanks for stopping by.
May you have a beautiful day.
Make someone happy sending them a handmade card filled with love.

Leave a comment