
Hello! It’s MONDAY, start of a new week – woohoo! Special plans/ opportunities/ or challenges set for yourself? I’m excited about sharing today’s project with you. I have created other Poinsettia Petals cards but not with watercolor. And that’s what I have done for today – watercolor… One of the things I have learned in this card making process, is it doesn’t have to be complicated to be beautiful. This card is not complicated, a bit time consuming maybe, but easy to break up into portions to keep the process moving along. I don’t do watercoloring nearly often enough and maybe this creation will get me back to it – as I enjoyed it quite a lot. Here’s my card…

Isn’t this pretty? I love the layers and the In Good Taste DSP creates a wonderfully simple background to show off this flower.
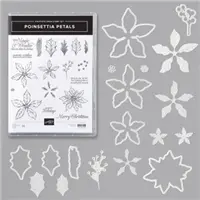
Process & Details…
- First we stamp the three poinsettia petals & at least three holly leaves using Versamark ink on the Watercolor Paper – yep, Poinsettia Petals stamp set. And yes, do clean the paper by swiping it with the embossing buddy first. Swish in Gold Embossing Powder and heat set with your heat gun.
- Watercolor using the new Water Painters: Cherry Cobbler ink & Real Red ink for the poinsettia petals; Old Olive ink and Garden Green ink for the holly leaves. I like to stamp my ink pad on an acrylic block and using my Water Painter add a bit of water, creating the depth of color I want. Begin with the lighter shade and add the darker. My poinsettias/ leaves turned out a bit lighter than I like but they are still beautiful. Set aside to dry.
- Cut Crumb Cake card stock for the card base 4 1/4 x 5 1/2. Cover with In Good Taste DSP 4 x 5 1/4 using liquid glue.
- Cut another Crumb cake panel 3 1/2 x 8 1/2, scoring at 4 1/4. Adhere to the center of the card base panel with liquid glue. Adhere another panel of In Good Taste DSP to this folded front panel 3 1/4 x 4.
- The watercolored Poinsettia Petals pieces should all be dry now, so die cut those with the Poinsetttia Dies.
- Die cut at least three berry sprigs from the Poinsettia Dies from Brushed Metallic Paper in Gold.
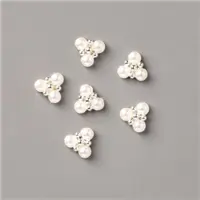
- Curl the poinsettia petals with a bone folder (the watercolor paper allows this beautifully) and put together with dimensionals. Adhere the beautiful Beaded Pearls element to the center.
- Adhere this poinsettia to the card front with liquid glue and add the holly leaves & berry die cuts to suit you. Yes, I did curl the leaves also, and I pulled up the berries a bit once dry. I love this three-dimensional look!
- Stamp the sentiment in Cherry Cobbler ink to a strip of Whisper White card stock and fussy cut. The sentiment comes from this wonderful Poinsettia Petals stamp set. Curl with the bone folder so the center is raised and each end as well. Double the dimensionals for the center of the sentiment and adherer with liquid glue just before the end curl and the card front is done!
- Cut a panel of Whisper White card stock 3 1/4 x 4, stamp the sentiment in Cherry Cobbler ink – again with a sentiment from the Poinsettia Petals stamp set. Stamp the pine bow in Garden Green ink – and yes, it is from the Poinsettia Petals stamp set.
- Adhere another panel of In Good Taste DSP (2 1/4 x 6) to the envelope flap and trim to fit. Stamp the pine bow over it in Garden Green ink. Also stamp the pine bow on the envelope front.


And here’s another photo as well

What a fun card! I MUST get back to doing more watercoloring… I really enjoy making Christmas cards, but soon I must stop ~ too many, too many… Guess I can resort to doing some fun tags for Christmas – yes! Perhaps that’s what I’ll do :O)
You will find the product list below. Please feel free to ask questions, either via this post or my email… tlsbrightspot@gmail.com. Thanks for being a customer! As a thank you I offer with a $50 – $150 purchase a SU! item valued at $10 – your choice of item! Please use my current HOST CODE XS4MSSFN when ordering now through Nov 18 to receive your free item.
Please let me know if I may assist you in some way.
Thanks for stopping by.
May you have a beautiful day.
Make someone happy by sending them a handmade card filled with love.


Leave a comment