Howdy! It’s Sunday… do you have routines for a Sunday? We certainly do… and they have changed some ever the last several months due to the pandemic. I look back and remember the routines of my family on a Sunday – it was something that could be counted on. I wonder in our routines of a Sunday if it’s something that will be handed down. I just finished reading a book by Lisa Wingate – The Book of Lost Friends. It’s about generational history, beautifully written. I highly recommend it.
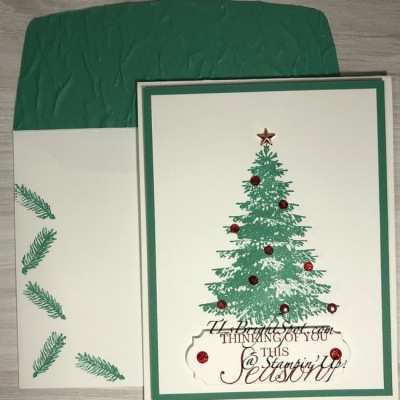
Today’s card looks like tradition to me – a stately tree, decorated for the holidays.

#1
Here’s what’s needed for this project….
- Thick Whisper White card stock and regular Whisper White cs
- Winter Woods stamp set
- Cherish the Season stamp set (inside sentiment)
- Ornate Frames Dies (banner on front)
- Just Jade card stock/ ink
- Cherry Cobbler ink
- Old World Paper 3D Embossing Folder
- Star Designer Elements
- Wonderful Gems
On a Whisper White panel, stamp this beautiful tree from Winter Woods stamp set in Just Jade ink. My inking pad is very inky so it was necessary for me to stamp off once. With another Whisper White scrap – say 1 1/4 x 3, stamp the sentiment in Cherry Cobbler ink. I love this combined font – so crisp! Using a die from Ornate Frames Dies, die cut, add dimensionals and adhere under the tree. Adhere this tree panel to Just Jade cs. It too should have dimensionals before adhering to the Thick Whisper White card base. I added the Star Element at the tree top, then the Wonderful Gems all over the tree and on the sentiment panel as well.
For the inside…

#2
I love how this turned out, and there’s a story here. I had cut my Whisper White panel and must have gotten distracted, cuz I stamped the trees as though it was a landscape profile, not portrait! (Yes, I needed to stamp off once more.) I went ahead and stamped the sentiment from Cherish the Season stamp set in Cherry Cobbler ink. It was then I realized the error. 😳 Instead of going into a panic, I simply cut the inked paper down to size, adhered it with liquid glue to the Just Jade panel and then into the card base. I adhered another panel below it for writing a message. Project saved!!!
For the envelope…

#3
I used a strip of Just Jade cs and ran it through the Old World Paper 3D Embossing Folder, adhered it with liquid glue and cut it to fit. For the from I stamped this sweet pine needle from the Winter Woods stamp set along the side and bottom in stamped off once Just Jade ink, And the card is complete – yay…
Thanks for stopping by.
May you have a beautiful day.
Make someone happy by sending them a handmade card filled with love.
<div><div><div id=”a9bc2bf4-c30d-4dbc-8578-16f4a7709b63″>https://mystampinblog.com/Showcase/Details/91952bed-c575-4eea-b807-746c5052c2bf?layout=Tiled&showSku=True&showPrice=True&showSalePrice=True&showAddToCart=False&showAddAllToCart=True&showDownload=True&transparent=True&bordered=True&hFontHeight=14&rFontHeight=13&imageHeight=120&middleContent=False</div>https://mystampinblog.com/Script/ShowcaseDetailsScript</div></div>
Card cuts for this project:
- Thick Whisper White 4 1/4 x 11 scored at 5 1/2
- Whisper White 3 3/4 x 5, scrap – say 1 1/4 x 3 (for front); 3 3/4 x 5 OR as shown 3 3/4 x 3 3/4, 1 1/8 x 3 3/4 (for inside)
- Just Jade 4 x 5 1/4 (x 2), 2 1/4 x 6
Whisper White

Leave a comment